
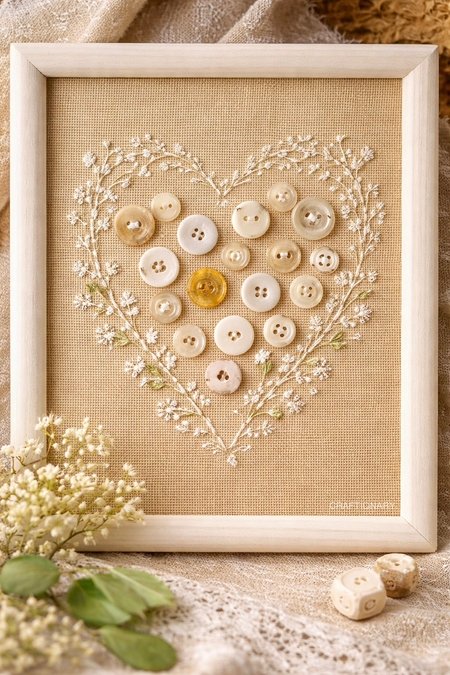
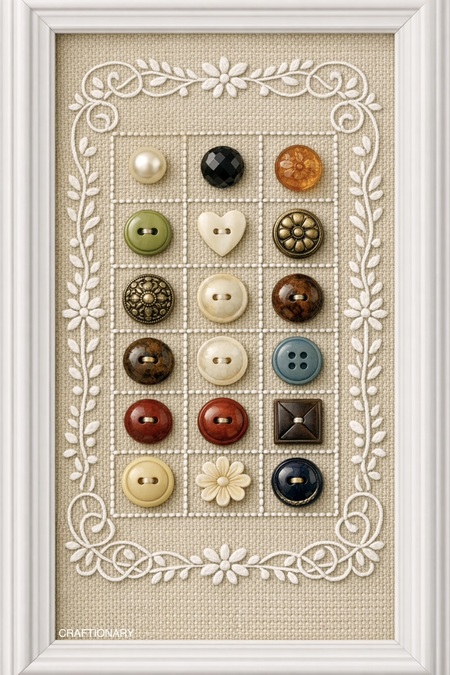
This button sampler is a beautiful way to mix embroidery with a curated collection of buttons. It creates a tactile, vintage-inspired piece that works perfectly as wall art or a personalized gift.
Here’s a step-by-step guide to making your own button embroidery sampler.
Materials needed
Base and frame
- Fabric: A strong, even-weave fabric such as linen or Aida cloth in a neutral oatmeal or cream color.
- white photo frame (by removing the glass) or a shadowbox frame (to accommodate the depth of the button).
- Cardboard or foam board for backing (optional).
Embroidery supplies
- Embroidery thread: White or cream cotton embroidery floss.
- Tools: An embroidery hoop, needle (fine enough to fit through button holes), and Fabric marker (Invisible ink).
- Buttons: 16-25 different buttons. Mix textures (pearl, wood, metal, plastic), colors and shapes (hearts, flowers, geometric) for visual interest.
other tools
- Ruler, scissors, glue (optional) and pins.
Embroidery Button Art Step by Step Instructions:
1. Preparing the fabric and planning the layout
- Measure your frame: Make sure your fabric is at least 2 inches wider than your frame backing that is cut on all sides. Iron it to remove wrinkles.
- Grid Setup: Using a ruler and invisible ink pen, lightly mark a 3 x 6 grid down the center of the fabric. Each cell should be slightly larger than your largest button.
- Border Sketch: Draw a rectangular border around the grid, leaving about an inch of space. Add simple floral vine swirls at each side corners and mid-points. Use carbon paper to transfer your printed design.
2. Frame and grid embroidery
It is much easier to do the stitching before the buttons are attached so that the thread does not snag.
- Grid: Use backstitch or a running stitch with 2 strands of floss to sew the vertical and horizontal lines of the grid.
- Border Design: You can feel using the cutout border design xtool Fill with cutting machine or satin stitch.
- Floral Border (Try This):
- stem: Use a stem stitch or backstitch for curved vines.
- Leaves: Use lazy daisy stitches (separate chain stitches) to make small leaves along the vines.
- Flowers: Use five or six idle daisy stitches at the center point to create the flower head.
3. Attach the buttons
- Arrangement: Place your buttons on a grid to find a pleasant balance of colors and sizes.
- Sewing: Secure each button to the center of its grid square.
- If using a shank button (one with a loop on the back), make sure the fabric is tight so the button doesn’t flop.
- For flat buttons, use 2-3 strands of floss and sew through the holes several times. Fasten securely at the back.
4. Finishing and Framing
- Clear: If you used a disappearing ink pen, remove the marks according to the pen’s instructions (usually water or a light iron mist).
- Mounting: Wrap the finished fabric tightly around a piece of acid-free foam board or the backing board of the frame. Secure the excess fabric in the back with pins, staples, or lacing.
- Shadowbox: Place the part inside the shadowbox frame. Depth is essential so the glass doesn’t flatten your button or use a photo frame without glass.
Related: Shadow Box Ideas – Practically Smart Ways to Display
Design Tips
- Monochrome Vs. Eclectic: When the image uses different colors, you can create a rustic look by using only white and clear glass buttons or only using wooden and brass buttons.
- Personalization: If this is for a specific room, try incorporating a few buttons from old family clothing to turn the artwork into a family heirloom.
- Creative Variation: Create a theme (floral, vintage, seasonal) or use monogrammed initials in the center.
- Keepsake: Turn it into a memory frame with meaningful buttons.
Here’s another idea:
Related: 40 Meaningful Memory Keepsake Ideas Treasure Life
This framed embroidery button art is a great example of how simple materials can create something elegant and timeless. The combination of delicate stitching and unique buttons makes each piece one of a kind.
Take your time with the layout and stitching – the beauty of this project is in the details.
You may also like:
60 Button Art Ideas for Your Handmade Boutique
Slow Stitching: A Guide to Mindful Hand Sewing with Creative Ideas


