


This stunning beaded dragonfly is a beautiful combination of structured wirework and delicate bead weaving.
Dragonflies have long been symbols of change, adaptability and spiritual growth. Beaded dragonflies are a timeless favorite, bridging the gap between delicate jewelry making and vibrant garden art. Whether you’re looking to make a dazzling dragonfly suncatcher, a whimsical garden stake, or a detailed seed bead pendant, this step-by-step tutorial will help you make one:
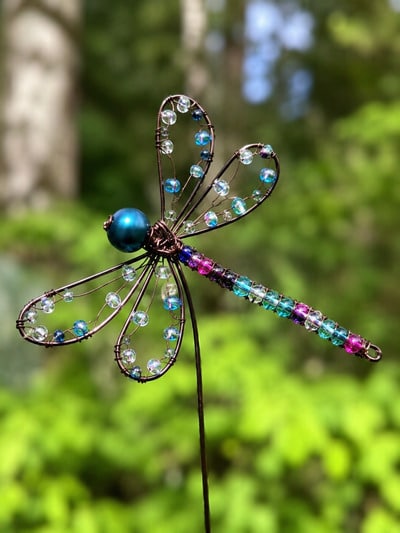
Necessary materials and equipment
- wire
- thick gauge wire (18 or 20 gauge): For structural frame (wings, main body backbone and garden stake stem). Use a darker bronze or copper color to match the image.
- Thin gauge wire (24 or 26 gauge): For wrapping, securing the wings and weaving small beads inside the wings.
- garland
- Head: 1 large metallic teal/blue Round focal bead (about 10-12 mm).
- Tail/Body: Translucent, shiny mixture seed beads or smaller Rondel beads (approx. 3–4mm) in a gradient of crimson, dark purple, teal and clear.
- Wings: A mix of small clear/ iridescent, light blue and dark blue Round beads.
- tools
- Wire cutter
- Round-nose pliers (for making loops)
- Chain-nose/flat-nose pliers (for gripping and bending)
Step by step instructions
1. Build the main body frame
- Cut the main spine: Cut a piece of thick gauge wire (about 5-6 inches) depending on how long you want your dragonfly to be. Cut another piece and leave it long (about 12-15 inches) if it is part of the garden.
- Make a tail loop: Using your round-nose pliers, make a small, secure loop at one end of the wire. This will prevent the body bead from sliding.
- Tail bead: Slide on your small body beads in repeating gradient patterns like magenta, purple, dark teal, light teal, clear, light teal and magenta. Continue until the beaded tail section is about 3 inches long.
- Protect the body: Leave a 1/2-inch gap of bare wire above the body bead. This is where you will attach the wings later.
- Join the bet: Coil the long wire into the gap area where you will attach the wings later. You can also connect the wings by wrapping thin wire after attaching them to form the thorax.
2. Shape the wing frames
You will need to make four separate wing frames using thick gauge wire.
- Upper wings (large): Cut two pieces of thick wire (approximately 5 inches each). Bend each into an elongated teardrop shape. Use your pliers to bend the ends sharply where they meet, leaving the two small wire tails at the base to join.
- Lower wings (small): Cut two pieces of thick wire (approximately 4 inches each) and shape them into a slightly shorter, rounded teardrop shape.
- Tip: Try to make the left and right pairs as symmetrical as possible!
3. Wing bead weaving
The magic of these wings is the appearance of floating beads, which are made by zigzagging thin wires.
- Cut a long piece of thin gauge wire (about 12 inches per strand).
- Anchor the thin wire to the base of the wing frame by wrapping it tightly 3-4 times.
- Draw a bead on the thin wire, pull it to the opposite side of the frame and wrap it once around the frame to secure it.
- Bring the wire back diagonally, add another bead and wrap it around the opposite frame.
- Continue this zigzag pattern up and down the wing, mixing clear, light blue and dark blue beads.
- Finish by wrapping the remaining wire tightly around the base and trimming the excess. Repeat for all four wings.
4. Assemble the Dragonfly
- Attach the wings: Take your four completed wings and place them in the space above your beaded tail. Two large wings point slightly upwards; Two small wings point slightly downwards.
- Wrap securely: Take a piece of thin wire and wrap it tightly around the base of all four wings and the spine of the main thick body. Cross the wire heavily to create a thick, strong thorax.
5. Add the head
- Slide your large metallic teal focal bead onto the main thick wire spine, sitting it directly on top of the wrapped wing cluster.
- Finish the top: To lock everything in place, use your round-nose pliers to make a small, tight loop just above the head bead, or tightly wrap the extra wire into a small decorative coil just above the bead hole. Trim any sharp edges.
- Optional: Spin the thin wire through the tail of the dragonfly to secure it in place and close the hook at the end.
Pro-Tip: If you’re using this as a garden stake, make sure the wire wrap is tighter around the center of your stake so the wings don’t move or sag when put out in the wind.
Cool ideas and creative variations
Want to take your beadwork to the next level? Try this unique twist:
- The Glow-in-the-Dark Garden Stack: Secure your finished wire dragonfly to a heavy-duty copper rod. Use glow-in-the-dark pony beads or highly reflective Aurora Borealis (AB) coated crystals to make the ornament glow beautifully in your garden at night.
- Fringe Earring Adaptations: Use brick stitch to create the dragonfly body, then dangle delicate, long strands of ombre seed beads from the wings to create stunning, bohemian-style fringe earrings.
- Suncatcher Chandelier: Make three or four small beaded dragonflies and hang them at different lengths from a driftwood branch or metal hoop, interspersed with larger prisms to scatter rainbows throughout your room.
You may also like:
Making bead crafts for adults: from simple to spectacular ideas



