
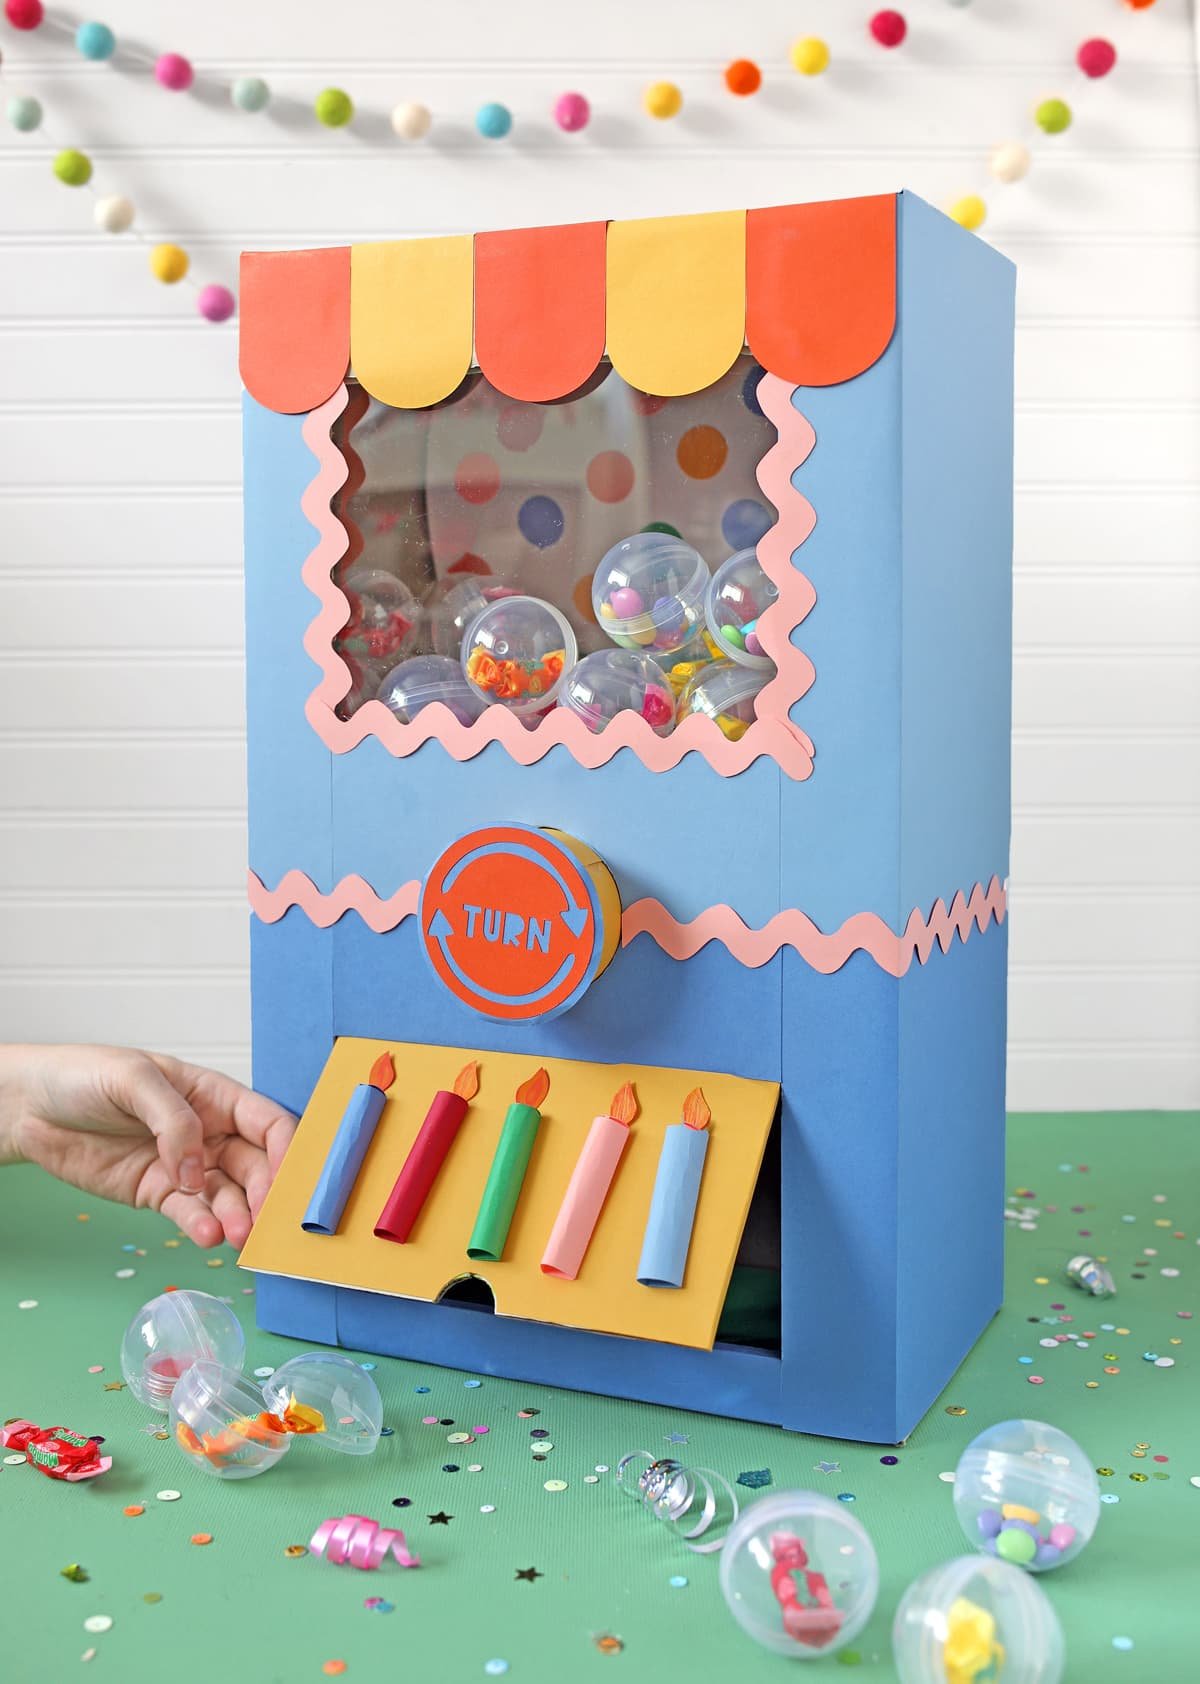
Learn how to turn a cardboard box into a working vending machine to use as a fun birthday party favor.

Hello my crafty friends! I am so excited about today’s craft project. I’m going to show you how to make a cardboard box vending machine! You may remember about gingerbread house machine with claws I did at Christmas. It was so much fun that I wanted to make another version to use for other occasions. And so I came up with the idea to make one for birthdays. Set it up so all the kids at the party can use the machine to hand out party favors or fill everything with gifts for the birthday boy or girl! You can build it according to your needs.
This post is sponsored by ASTRODESIGNS® Papers – www.Astrobrights.com
Are you ready to get crafty? Here’s what you’ll need.

Required materials
Click on any highlighted item in the supply list for more information. Affiliate links may be used.
You can use any size cardboard box. To give you a point of reference, mine measures 19 inches tall, 12 inches wide, and 7 inches deep.
There are two important measurements for the cardboard tube.
- It must be large enough to fit a prize ball inside. The prize balls I used are 2 inches and this old biscuit tin was perfectly sized at about 2.5 inches in diameter. A chip box would also work great, but most paper towel tubes and wrapping paper rolls will probably be too narrow.
- It should be longer than the depth of your box. The pipe should touch the back of the box and protrude above the front of the box. My box is 7 inches deep and the pipe I used is 8.5 inches long.
Instructions
Front of the box
Step 1: Draw three areas on the front of the box: a window, a circle, and a lid. You can make the window and cover any size you think looks good, but the circle must be sized so that the cardboard tube fits perfectly inside it.
Step 2: Use a utility blade to carefully cut out the window and circle. Cut only the bottom and side lines of the prize cover. Carefully cut the top edge of the lid so that it acts as a hinge to open and close the lid.

Box inside
Step 1: Use cardboard scraps to build a shelf between the window and the circle. The shelf should be the same depth as the box from front to back and then angled down in the middle to touch the top of the circle.
One important note: make sure the gap between the two shelf pieces is large enough for the ball to fit through.
Step 2: Attach these parts to the box. I used a mixture of hot glue and tape. I taped the narrow front edges down, then reinforced with duct tape, then added more glue at the joints.

Step 3: Cut a piece of Plexiglas larger than your prize window. Line up the edges with tape, then place it over the window on the inside of the box.

Step 4: Add a strip of cardboard along the back edge of the shelf. This will prevent your balls from rolling around when you open the back to fill the machine. This piece will be visible so I lined it with cute paper.

Step 5: The last thing we need to do inside is to make a small ledge for the pipe to rest on at the back. I mounted this little cradle and glued it to the lower back cover so that when the box is closed the tube is supported inside the cradle.

pipe
Step 1: Cut a square hole in the center of the prize tube that is large enough to fit a prize ball.
Step 2: Add cardboard pieces inside the tube to block both ends so that the ball cannot slide from end to end but can only stay in the center part where the hole is. This prevents the balls from getting stuck in the tube.

Insert the tube through the hole in the front of the box. Are you starting to see how the mechanism will work? The tube starts with the opening down. When you turn the pipe, it reveals the hole and a ball can fall inside. You then continue to rotate the tube and the prize ball drops to the bottom of the box where the lid is so it can be retrieved.
Isn’t that so cool?!
Decorations
Now comes my very favorite part. We can add all the fun and chic!
I really enjoyed using this huge pack of Astrodesigns® Cardstock. The colors are so vibrant. And I can’t shake the feeling of limitless possibilities when I hold a new test paper. You can do so much with it!

First I covered the entire box with paper. I made a little scalloped awning on top and cut out a design to add to the end of the pipe. I added arrows and the word “spin” to make it look more like an automaton.

I created 3D candles to add to the award lid and oh man. These turned out to be very nice! Want a lesson? Let me know!

I also thought the box needed some trimming so I paper cut it to look like pink ric rac and I love that little detail.

The last decoration I added was a polka dot background for the prize window. I attached this to the inside back cover of the box right along one edge so that I could open the back to load the prizes inside.

Prize balls
Fill the prize balls with small toys or candy or whatever you like. With the gingerbread house machine I also made tickets to be redeemed for bigger prizes. This is a fun idea and allows you more options for the types of prizes you can give out.

Place all the prize balls in the window section, then close the back of your box and you’re done!!

And now you can test your slot machine and claim a prize!

If I were to do this project again, I would cut off the entire back of the box, then make a new door from a large piece of cardboard, then attach it to the back of the box on a “hinge” made of tape. I think this will simplify the process of getting into the back of the box and make it easier to attach the decorative pad (dotted area) and the skirting for the pipe to rest on. I was wayyyyy too deep before I knew it. But if you do this project, you should consider it.
Anyway, I really like how this DIY turned out. It’s a lot of fun and my kids are already begging to play with it. lol That’s how you know you’ve done something great.

Thanks to Astrodesigns Papers for partnering with me. I love a good creative challenge!
DIY birthday reward machine


