
Learn how to make these stunning sequin and pearl covered eggs. This is a great Easter craft idea for adults.

hi I’m so excited about today’s craft lesson. I will show you how to make the most beautiful Easter eggs covered in floral sequins and pearls. They remind me a little of the Fabergé complex eggs from Russia, but a more spring-inspired version.

This post is sponsored by Hobby Lobby.
You can make these DIY gem eggs yourself, no artistic talent required except patience. It’s actually quite easy! I’ll walk you through every step. let’s go!
You can get all the supplies you need for this craft Hobby Lobby.

Required materials
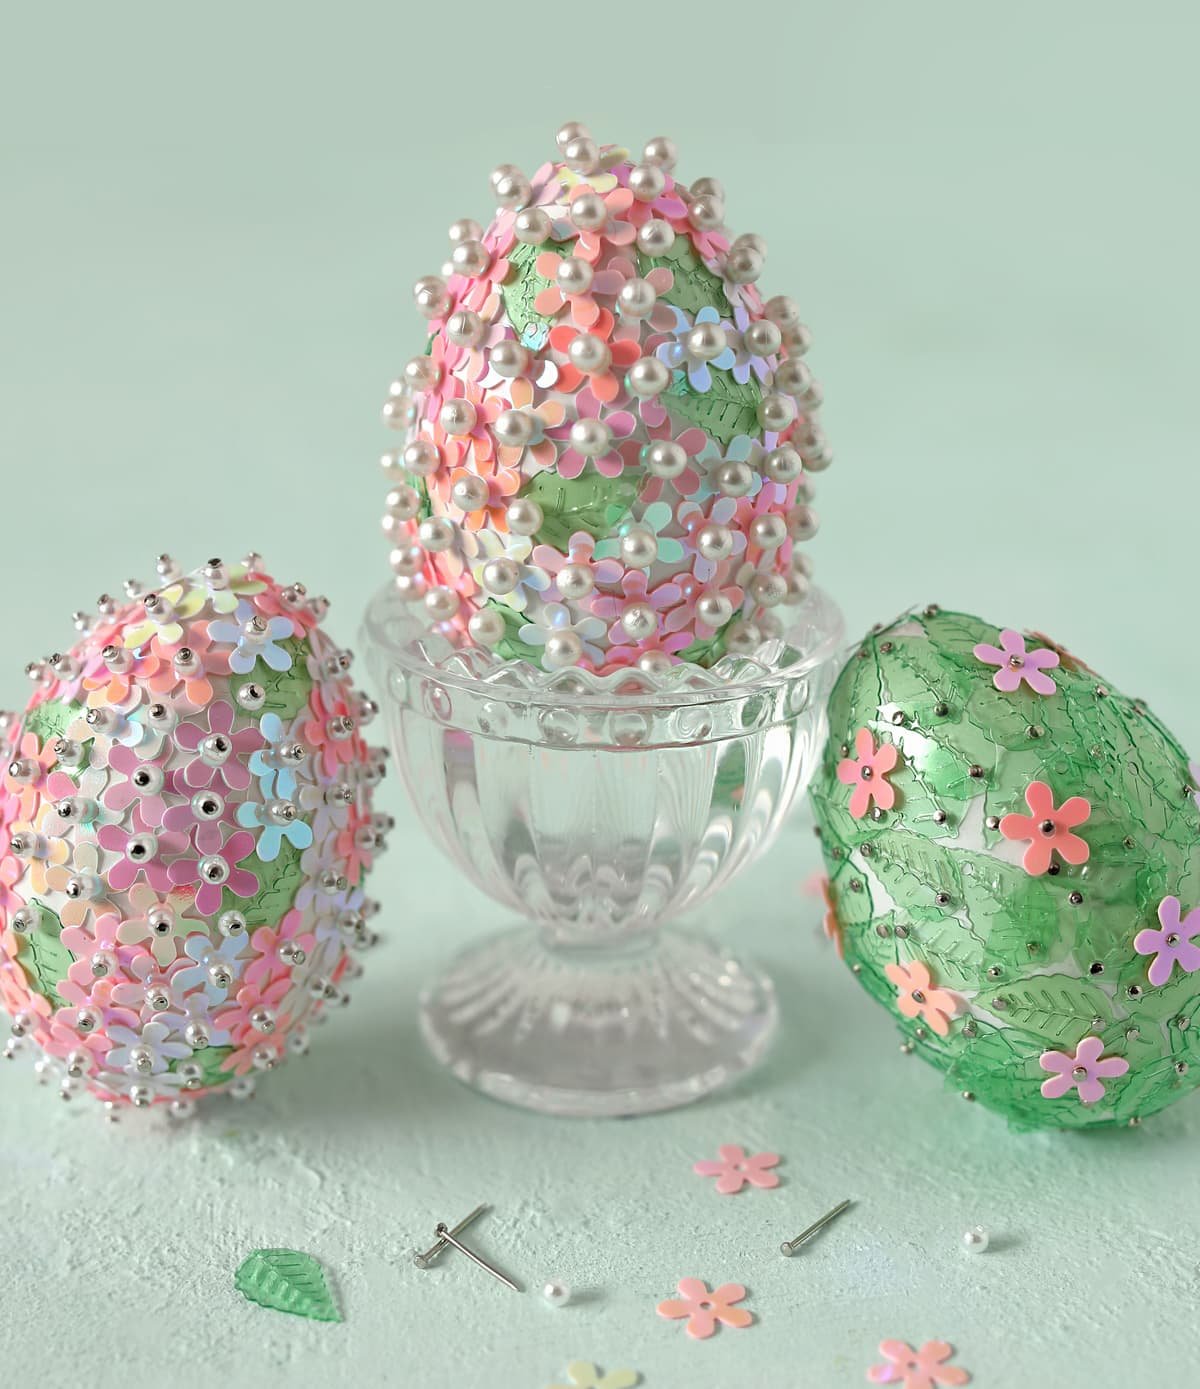
- Craft foam eggs
- Blooming Meadow Sequins (look in the sequins section of the store)
-And-
-OR-
You have two choices for the pins here: use plain sequin pins and add your own small pearls (or any other 3mm bead of your choice) OR you can buy pearl pins that already have a beautiful pearl head. Or you can use
All of these options work. All results are good. Here are the differences:
- Needles with sequins – Using the regular pins plus a small bead means you have a huge variety of bead color options. This option is also cheaper. The main disadvantage is that it is difficult to hold these tiny little pins
- Needles with pearl head – The pearl head pins are larger which gives a different feel to the finished egg. These were easier to work with because you save a step when adding beads and they are larger in size so easier to grip. They are more expensive. I used almost a whole package (150 pieces) of the pearl pins for one egg.
- No pearls – You can also skip all the beads and just use the pins. This gives the finished egg a flatter look and makes the sequins the star of the show.

The embroidered table runner and cabbage bowl the ones pictured above are from Hobby Lobby, but the table runner isn’t listed on their site, so you’ll have to look for it in store. Aren’t they both beautiful pieces?!
Instructions
This project is ridiculously simple as far as instructions go.
- If using sequin needles, add a bead to the needle. If using pearl head needles, skip this step.
- Add sequins.
- Stick the pin into the egg.
- Repeat until all the egg is covered.
Easy peasy!

But here’s what you really need to know:
Tips and tricks
- The little sequined needles are hard to grip and hurt my hands pushing them into the eggs. The best solution I found was to grip the pin in a pair of jewelry pliers, add the bead, then add the sequin, then hold the pin firmly in the pliers and use them to push the pin down into the egg.
- The pearl pins are much easier to handle, but the part of the egg around the seam line is thicker, so sometimes the pins didn’t want to go in. I suggest using a sewing needle or pin to make a starter hole if you ever need extra help getting the pins in. But don’t make too big a hole or the sequin needle will slip right out.
- Although this craft is EASY, it takes quite a bit of time to complete. I really enjoy listening to a book and having something to occupy my hands, so I see that as an advantage. Mindless scraping with crafts like this is so comforting to me. Some call it annoying, but I love it! I haven’t timed it, but I’d say it took me about an hour to finish each egg.

It was really fun to try an egg using mostly leaf shaped sequins. This one looks the most easterly of all to me! I love how each egg is different but they go together. They are just the cutest trio!

DIY sequin and bead Easter egg video tutorial

I will definitely be making more of these in the future. I’m already on the hunt for different shapes of sequins and will be looking for a pastel pack of small beads to use with the sequin pins instead of the baby pearls just to see how it would look. So many possibilities! Which egg is your favorite?


