
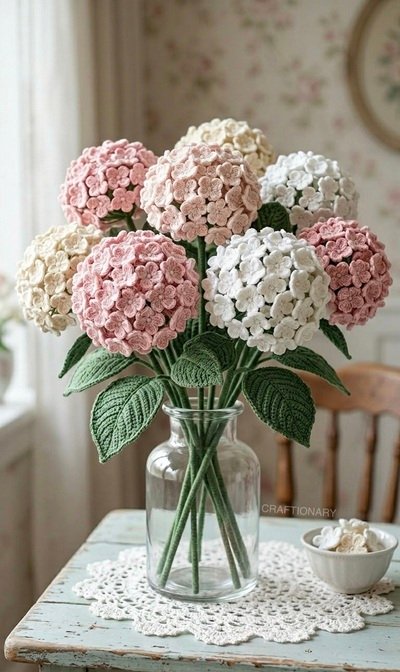
Creating a permanent flower arrangement like the one pictured is a perfect way to bring eternal spring into your home. This DIY crochet hydrangea bouquet project is a favorite among fiber artists because it combines simple repeating stitches with a stunning, high-impact result.
Unlike real hydrangeas, which die within days, these hand-stitched blooms provide a lasting touch of subdued decor for your living space.
1. Crochet Hydrangea Flowers Free Pattern:
Crocheting a full bouquet can seem intimidating, but it’s actually one of the best ways to practice basic skills. Because hydrangeas are made up of many small flowers, you can perfect your technique on one small flower before moving on to another. It’s a low-stress, portable project that allows you to see progress quickly.

Materials Required:
To achieve the soft, realistic texture seen in the image, you will need:
- Yarn: Fine weight (level 2) or sport weight cotton yarn in cream, dusty pink, soft mauve and sage green. Cotton is preferred over acrylic as it gives better stitch definition for the petals.
- Crochet Hook: 2.25 mm Or 2.75 mm (B or C). Using a slightly smaller hook than the yarn label recommends ensures that the petals are stiff and hold their shape.
- stem: 18-gauge floral wire or wooden skewers.
- Assembly: A hot glue gun or floral tape, and a small styrofoam ball (optional) serve as a base for the bloom.
Step by step instructions
1. Individual florets (make 40-50 per bloom)
The secret to lush hydrangea is volume. Each bloom is a cluster of small four-petalled flowers.
- Round 1: Create a magic ring.
- Round 2: Chain 2, 2 double crochet (DC) in ring, chain 2, slip stitch in ring. Repeat this sequence 4 times to make 4 petals.
- finish: Pull the magic ring tight and close, leaving a small tail for assembly.
2. Real sage leaf
- Support: Chain 15.
- Row 1: Single crochet (SC) in 2nd chain from hook, next half double crochet (HDC), DC in next 8, HDC, SC. (In tip to turn 3 SC).
- Back side: Work back to the opposite side of the chain following the same pattern (SC, HDC, 8 DC, HDC, SC).
- Detail: Slip stitch around the entire edge to create a sturdy border. For a more realistic look, you can crochet over a thin piece of wire during this final round.
3. Bloom ball assembling
There are two ways to assemble your hydrangea:
- Styrofoam Method: Glue a 2-inch styrofoam ball to the top of your floral wire. Use hot glue to pin the center of each floret to the ball until it is completely covered and rounded.
- Cluster method: Bundle your florets together in small groups of 3 or 4 using floral tape, then tie those bundles together on the main stem.
4. Finish the stem
Take your sage green yarn and apply a small dab of glue to the top of the floral wire (just below the flower). Wrap the yarn tightly down the length of the wire to hide the metal. Half way down, tuck your leaves against the stem and continue wrapping at their base to secure them.
Here’s another idea you can make by tweaking the above directions a bit.
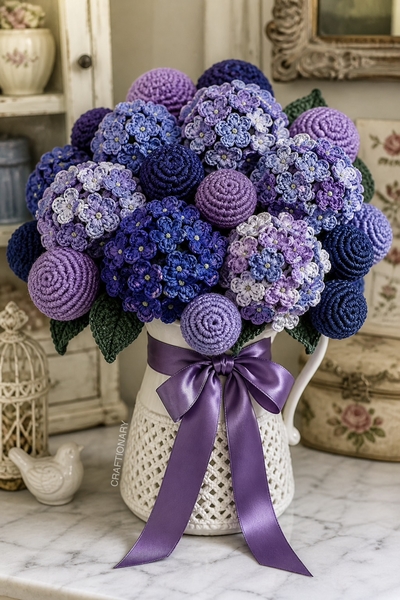
2. Hydrangea Pitcher Arrangement:
Materials Required:
To get the deep purple and varied texture seen in the image, you’ll need:
- Yarn: Light weight (level 3) or sport weight cotton yarn in various shades: deep violet, periwinkle, lavender and royal blue. Use a dark forest green for the leaves.
- Crochet Hook: 2.5mm or 3.0mm. A small hook is better to make sure the stitches are tight and the flowers hold their shape.
- stem: 18-gauge floral wire.
- Assembly: A hot glue gun, floral tape, and small styrofoam balls (1.5 to 2 inches) serve as the base for the inflated head.
- Additional: A white ceramic pitcher and purple satin ribbon to finish off the look.
Step by step instructions
1. Individual floret (petals)
Each large head of a hydrangea is a cluster of small flowers with four petals. Follow the same instructions as above.2.
2. Ornamental Buds (Spheres)
The image features solid, textured balls that intersect with flowers. These are made using amigurumi techniques.
- Round 1: 6 single crochet (SC) in magic ring.
- Round 2: 2 SC in each stitch (12).
- Round 3: 1 SC, 2 SC in next (18).
- Rounds 4-6: SC around.
- Round 7: 1 SC, decrease (12). Material with fiberfill.
- Round 8: Cut around and off.
3. Sage green leaf
Same instructions as above. For the textured look seen in the photo, do a final round of reverse single crochet (crab stitch) around the edges.
4. Assembling the bouquet
- Head: Apply hot glue to a styrofoam ball and press your florets onto it until the surface is completely covered.
- stem: Wrap floral wire in green yarn or green floral tape. Insert the wire into the base of the styrofoam ball with a little glue.
- Leaves: Glue the leaves to the stem about 3 inches below the flower head.
General questions
1. How do you make the flowers look more vintage or realistic?
In the image, the colors are muted. Look for heathered or dusty yarn tones rather than bright primaries. You can also use a light touch of pink eyeshadow or fabric marker on the edges of the white petals to give them a natural sun-kissed look.
2. How do you clean your crochet bouquet?
Dust is the main enemy of fiber art. Use a hairdryer on a cool, low setting to remove dust, or use a soft-bristled makeup brush to gently brush the petals.
3. What is the best way to display them?
As shown in the image, a simple clear glass apothecary jar or vintage milk bottle complements the texture of the yarn perfectly. Placing a dolly underneath creates a chic chic aesthetic.
Key techniques to consider for success
- Magic Ring: This is essential for flower centers; It allows you to pull the middle tight so there is no visible hole.
- Stitch Definition: This refers to how clearly you can see the individual loops of yarn. High stitch definition makes the flowers look more professional.
- Slow Stitching: A mindful, deliberate crafting practice—perfect for projects like this that require repetitive, quiet movements.
You don’t just craft; You are creating a piece of art that brings a sense of calm and beauty to any room. I hope you find these instructions useful. Share your finished projects with us Facebook And get specialized.
You may also like:
50 free amigurumi crochet patterns to love
Beginner crochet plant free pattern for first time crocheters


