


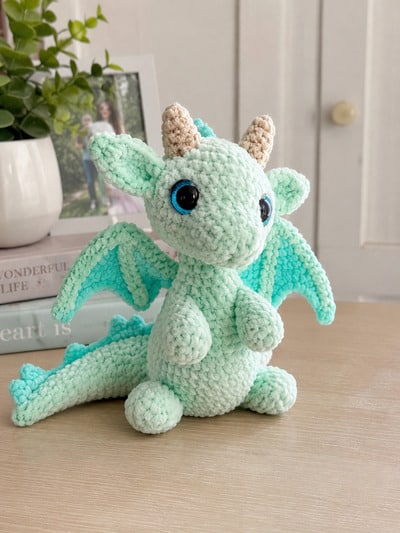
There’s something about baby dragons that just works—small horns, big wings. This dragon looks soft and huggable rather than fierce, so a pastel mint-and-teal palette with cream horns and a pop of sparkle in the eyes make it unique. The result is a sweet, sturdy little dragon, sitting about 8-9 inches tall, with perfectly poseable wings and a curved tail that gives it a lot of personality on the shelf.
This is a solid intermediate pattern. If you’ve made a basic amigurumi bear or bunny before, you’re all set — the wings and horns are the only few tricky parts.
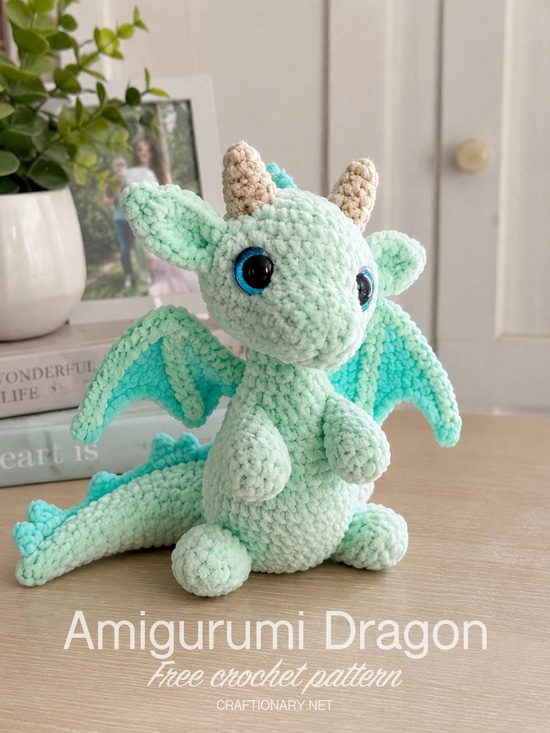
Here is a detailed, step-by-step amigurumi pattern to make your own adorable plush dragon.
This pattern is worked in continuous rounds (unless otherwise stated). Use a stitch marker to keep track of the start of each round.
Materials needed
- Yarn: Super bulk (size 6) chenille/plush yarn In mint green (main body color), approx. 120g, teal (wing webbing, spine, under tail), approx 40g, and a small amount of beige/cream (for horns), approx. 10 grams.
- Hook Size: 5.5mm (I-9) crochet hook (or the size needed to get a tight, gap-free stitch) – Wide chenille yarn works up quickly, so if your gauge runs loose then size down from what the yarn label indicates.
- Eyes: 12 mm safety eyes With sparkle/glitter iris.
- Other: Fiberfill fillingYarn needle, scissors and stitch marker. A small amount of black yarn or embroidery floss for an optional mouth detail.
Abbreviations (US Terms)
Gauge isn’t critical for amigurumi — you’re working in the round and filling in as you go, so a slight variation in size is perfectly fine. Aim for a tension just tight enough that the filling doesn’t peek through your stitches.
- MR: Magic Ring
- ch: Chain
- sc: Single crochet
- inc: Increase (2 sc in one stitch)
- Dec: Decrease (invisible single crochet decrease recommended)
- hdc: Half double crochet
- DC: Double crochet
- sl st: Slip stitch
- st(s): quote
- ( ): Repeat the number of instructions indicated in parentheses
- ( ): Total number of stitches at the end of the round
Pattern Notes:
Work in continuous spiral rounds until noted (do not join/turn). Use a stitch marker to track the beginning of each round — it’s easy to lose your place on a body this size. Be sure to stuff as you go instead of waiting until the piece is finished; This way it is very easy to distribute the filling evenly.
Baby Dragon Amigurumi Crochet Pattern Instructions
1. Body (mint-worked, from base up)
- R1: MR, 6 sc in ring (6)
- R2: Around Inc (12)
- R3: (Sc 1, inc) x6 (18)
- R4: (Sc 2, inc) x6 (24)
- R5: (Sc 3, inc) x6 (30)
- R6: (Sc 4, inc) x6 (36)
- R7–14: Sc around, no increase (36) — 8 rounds too
- R15: (Sc 4, dec) x6 (30)
- R16: (30) Around Sc
- R17: (Sc 3, dec) x6 (24)
- R18–20: Sc around (24) — 3 rounds too
At this point, start filling the base firmly. Continue stuffing as you work your way up.
- R21: (Sc 2, inc) x6 — Begin shaping shoulder (30)
- R22: (Sc 4, inc) x6 (36)
- R23–26: Sc around (36) — 4 rounds even, this is the chest/shoulder area
- R27: (Sc 4, dec) x6 (30)
- R28: (Sc 3, dec) x6 (24) — Begin neck taper
- R29: (Sc 2, dec) x6 (18)
- R30–32: Sc around (18) — Neck, 3 rounds too
Firmly fill in the neck and upper body before moving on to the head. Don’t close – the head acts as a continuation of the body to join the seamless neck.
2. Head (continue directly from the neck)
- R33: (Sc 2, inc) x6 (24)
- R34: (Sc 3, inc) x6 (30)
- R35: (Sc 4, inc) x6 (36)
- R36: (Sc 5, inc) x6 (42)
- R37–43: Sc around (42) — 7 round sum, this creates a rounded skull and snout base
Now attach the safety eyesBetween rounds 39 and 40, about 8-9 stitches apart on either side of center front. Try them in different positions and look at the head from the front and above before arching the back — that way you get a sweet, forward-looking expression.
- R44: (Sc 5, dec) x6 (36)
- R45: (Sc 4, dec) x6 (30)
- R46: (Sc 3, dec) x6 (24) — Muzzle taper starts here
- R47: (Sc 2, dec) x6 (18)
Stuff the head very firmly, pushing the extra stuffing into the snout area.
- R48: (Sc 1, dec) x6 (12)
- R49: Around December (6)
Close, leaving a long tail. Knit the tail through the next loops of the remaining 6 stitches, cinch off and secure.
3. Snout detail
For a slightly rounded muzzle look, before closing Round 49, use black yarn to embroider two small nostril dots on either side of the front-center of Round 46, and sew a smooth curved smile under them using backstitch.
4. Arms (make 2, in mint)
- R1: MR, 6 sc in ring (6)
- R2: Around Inc (12)
- R3: Sc around (12)
- R4: (Sc 4, dec) x2 (10)
- R5–11: (10) Sc around — 7 rounds too
Stuff lightly (hands should be soft/floppy for a cute droppy pose, not stiff).
Tie off, leaving a tail for sewing. Flatten the top slightly and sew the arms around 22-25 rounds on the sides of the body, slightly at the front corner.
5. Legs (make 2, mint)
- R1: MR, 6 sc in ring (6)
- R2: Around Inc (12)
- R3: (Sc 1, inc) x6 (18)
- R4: Sc around (18)
- R5: (Sc 2, dec) x6 — shape legs (12)
- R6–14: Sc around (12) — 9 rounds even, filling in firmly as you go
- R15: Around December (6)
Tie off, leaving a tail. The legs are worked straight and sewn to the dragon in a sitting position – place them on either side of the lower body, make 8-12 rounds, splayed slightly outwards so the dragon can sit stably.
6. Wings (make 2 — this is the showpiece piece, work flat)
The wings are worked flat in rows, minted for outer edges and struts, forming webbing with teal panels. In fact, for a batwing shape like this, a flat construction works better than a round base. Here is the approach:
Wing Base (Mint):
- Chain 3. Row 1: sc in second ch from hook, sc in next ch (2 sc).
- Row 2: inc, sc (3).
- Row 3: inc, sc, sc (4).
Continue increasing at the beginning of each row for a total of 6 rows until you have a fan shape that is about 4 inches at the widest point (about 8 sts wide).
Wing Fingers:
From the wide edge, chain 6-8 for each extension of the 4 fingers, then screw each chain back, sc into the base, and repeat for the next finger — this creates the clawed, membrane-looking edge you see in the photo, similar to how you shape scalloped points on projects like your pipe cleaner flowers, instead of just scalloping and working the top.
Teal Webbing Panel:
With teal, work a row of sc directly across the bottom row of fingers at the base of the mint, filling in the web area between the finger points. This is what creates the two-tone look – mint frame, teal membrane.
Weave in the ends leaving a long tail at the base of each wing to sew. Pin the wings to the upper back/shoulder area (around 24-27 body rounds) before sewing, angled and slightly out and try out the position a bit – this is what gives your finished dragon its personality, so don’t rush this step.
7. Horns (make 2, in cream)
- R1: MR, 5 sc in ring (5)
- R2: Sc around (5)
- R3–8: Sc around (5) — 6 rounds even, no increase, this creates a narrow tapered horn shape
Stuff very lightly, just enough to hold the shape – the horns should feel firm but not too full, so they curve naturally rather than sitting stiff and straight.
Tie off, leaving a tail. Sew the horns to the top of the head, slightly back and outward, on either side of the center, behind where the eyes sit.
8. Ears (make 2, mint)
- R1: MR, 4 sc in ring (4)
- R2: Around Inc (8)
- R3: Sc around (8)
- R4: (Sc 2, inc) x2 (10)
- R5–6: Sc around (10)
Tie off, leaving a tail. Flatten and sew the sides of the head, just behind the horns and slightly below, angled outwards.
9. Tail (in mint, with teal spine ridge)
- R1: MR, 6 sc in ring (6)
- R2: Around Inc (12)
- R3–4: (12) Sc around — 2 rounds too
- R5: (Sc 4, dec) x2 (10)
- R6–8: (10) Sc around — 3 rounds too
- R9: (Sc 3, dec) x2 (8)
- R10-20: Sc (8) around, stuffing lightly and evenly as you go — tail should be soft enough to curl
- R21: Dec, sc around (7)
- R22–26: Sc around (7)
- R27: Dec, sc around (6)
- R28–30: Sc around (6), stuffing a little
Tie off, leaving a tail. Sew the wide end of the tail to the base/bottom of the body, and curl it around a hip in a gentle spiral before securing it with a few stitches along its length – this is what holds the curved pose rather than letting it flop straight out.
Spine Ridge (Teal):
For that classic dragon-spike silhouette, attach the teal yarn to the base of the tail and work small picot-style dots (chain 2, SC back) evenly spaced along the top of the tail.
10. Assembly Checklist
- Sew hands to shoulder, slightly forward angle
- Sew the legs to the lower part of the body in a sitting position
- Sew the wings to the upper back, positioned and angled as per your preference
- Sew the horns on the head, behind the eyes
- Sew the ears behind the horns
- Sew the tail to the base, curled around a hip
- Embroidered spine ridge points from tail to head in teal
- Embroidered nostrils and black smiles
- Weave in all remaining ends and give your dragon a final fluff/trim of any stray fibers.
A few notes for making this:
The eyes really make or set this dragon — I’d encourage you to safety-pin or place the eyes and look at the head from several angles before committing, just as I always tell you to check the flower petals or scrapbook layout a few steps later before gluing anything down. A few millimeters of difference in eye placement is the difference between sweet and surprised.
If your chenille yarn is splitting as you go (it happens, especially on horns where the stitch count is low), try going to a slightly smaller hook – it increases your tension and gives the yarn less room to separate.
Note: This pattern is written for personal use and gift giving. If you make one, I’d love to see it. Tag your finished dragon so I can share it.
You may also like:
50 free amigurumi crochet patterns to love
Cute Crochet Amigurumi Miniatures Free Pattern and Instructions



