
Learn how to make these easy and cute beaded bow keychains. This is a perfect nighttime craft for girls!

You know I love a good craft that is cute, cheap and easy. It’s the perfect trio if you ask me! And today’s craft tutorial totally fits the bill. I’m going to show you how to make these adorable beaded bow key chains. Once you learn how to make them, you won’t want to stop! I’ll walk you through every step, so even if you’ve never made jewelry before, YOU GET IT!
To get started, you’ll need the following supplies:

Required materials
Click on any highlighted item in the supply list for more information. Affiliate links may be used.
You can use any type, style, and size of beads for this project, you’ll just need to adjust the thickness of the wire and the total number of beads used for scaling.
Wire gauge refers to the thickness of the wire. The smaller the number, the thicker the wire. For example, 12 gauge wire is thick and 32 gauge wire is thin. The thickness of wire you choose depends on the hole size of the beads you are using. Make sure that whatever combination you choose, the wire can fit twice through the bead holes. Thicker wire is stronger but more difficult to bend. Thinner wire is prone to breaking if you twist it too hard. And if all of that is too much for you, just buy some 26 gauge wire and 6/0 beads because I know the sizing will work for this project. lol
Instructions
There’s a video tutorial at the end of this post if that’s helpful.
Step 1: Cut an 18″ piece of wire. Find the center, thread it through the loop of the key ring, then twist it once or twice to secure it in place. Be careful with the wire so you don’t break it. (This applies to every step of this project.)

Step 2: String about 20 beads on each side of the wire. You can adjust this number to make a larger or smaller bow, just make sure there are an even number of beads on both sides.

Step 3: String another bead onto the left wire, then cross the right wire from the other direction as follows:

Pull this bead tight until it touches the other beads, forming a circle.
Step 4: Wrap both ends of the wire up and over the loop of the keychain, then twist them and bring them back down. This forms the two loops of the bow.

Step 5: Add an equal number of beads to each wire until you like the look of your tails. I made 14 beads in the example shown. I suggest finishing one tail at a time so that all the beads don’t fall off one side while you work on the other.

Step 6: Now that your bow is shaped, it’s time to finish the ends of the wire. Wrap the wire around a pair of jewelry pliers, then wrap the wire around the base of the loop twice. Hold everything tight, but no too tight. You don’t want to break the wire.

Step 7: Bring the remaining wire back through the last bead and pull it gently until everything is smooth and tight. Cut the extra wire as close to the bead as possible, then tuck the tip of the wire inside the bead so that no sharp edges are exposed.

and yes yes! this is how to make a beaded bow key chain. So stinking cute.

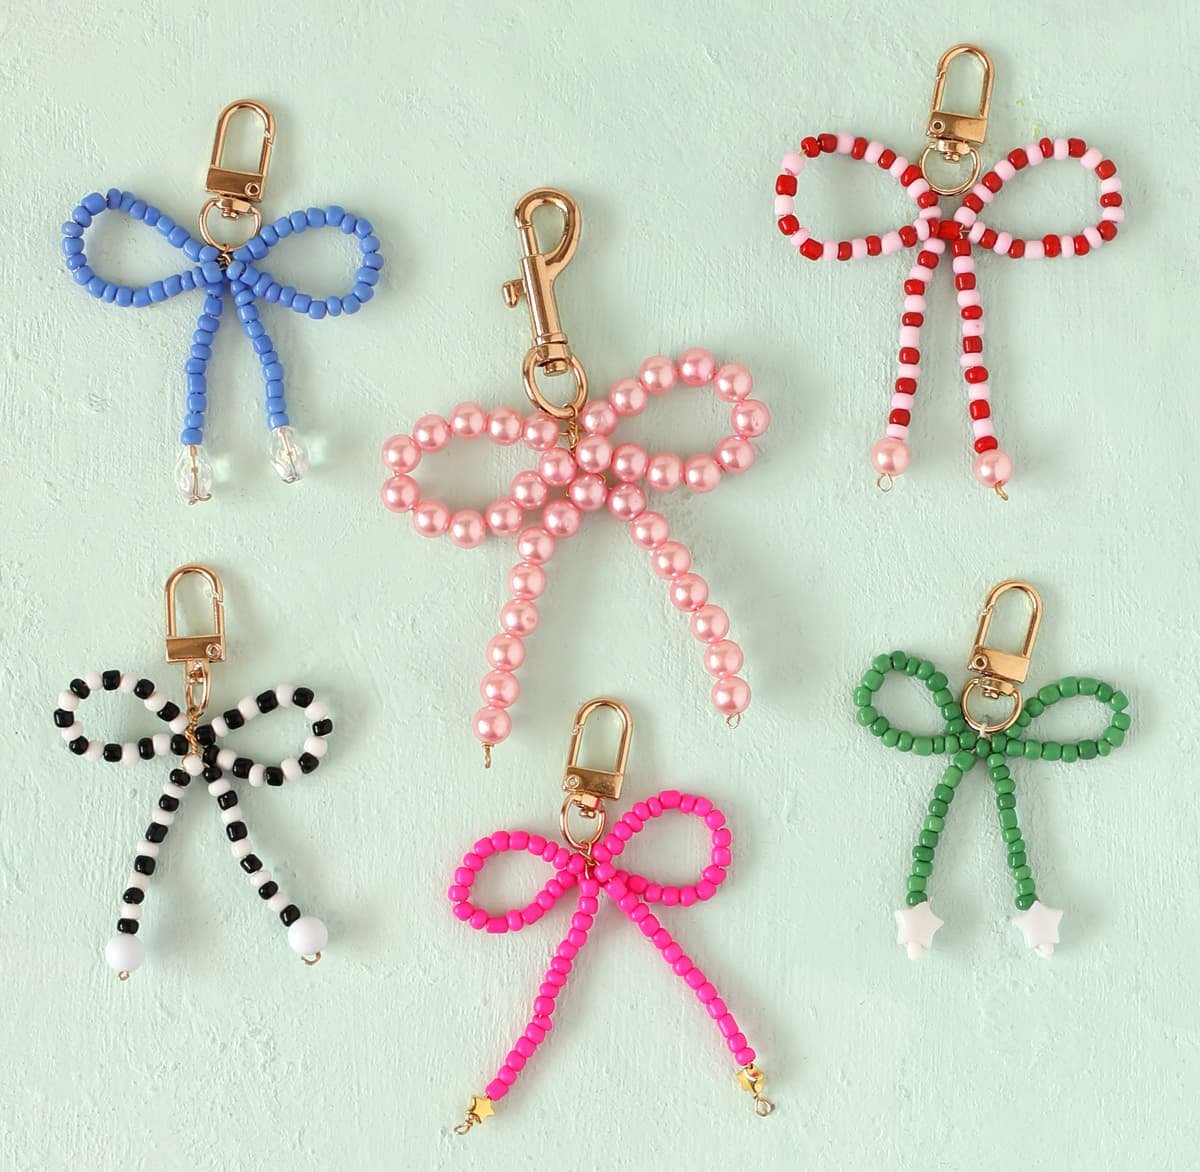
There are many variations you can try with this craft. Try to make a pattern of different colored beads. Add special accent beads at the ends or in the center position of the loops. Use different shapes, sizes and patterns of beads and the possibilities are truly endless.

This craft is the perfect night craft idea for girls. It’s easy and doesn’t take much time to make, and if you just buy a variety pack of beads, anyone can customize their bow keychain to match their style. Also, it’s kind of pointless to just string beads on wire so you can easily talk up a storm while you work. SO MUCH FUN!
Teens and tweens would also love these beaded ribbons. I would recommend this craft for anyone over 10.

Beaded Bow Keychain Video Tutorial


