

Sharing is caring!
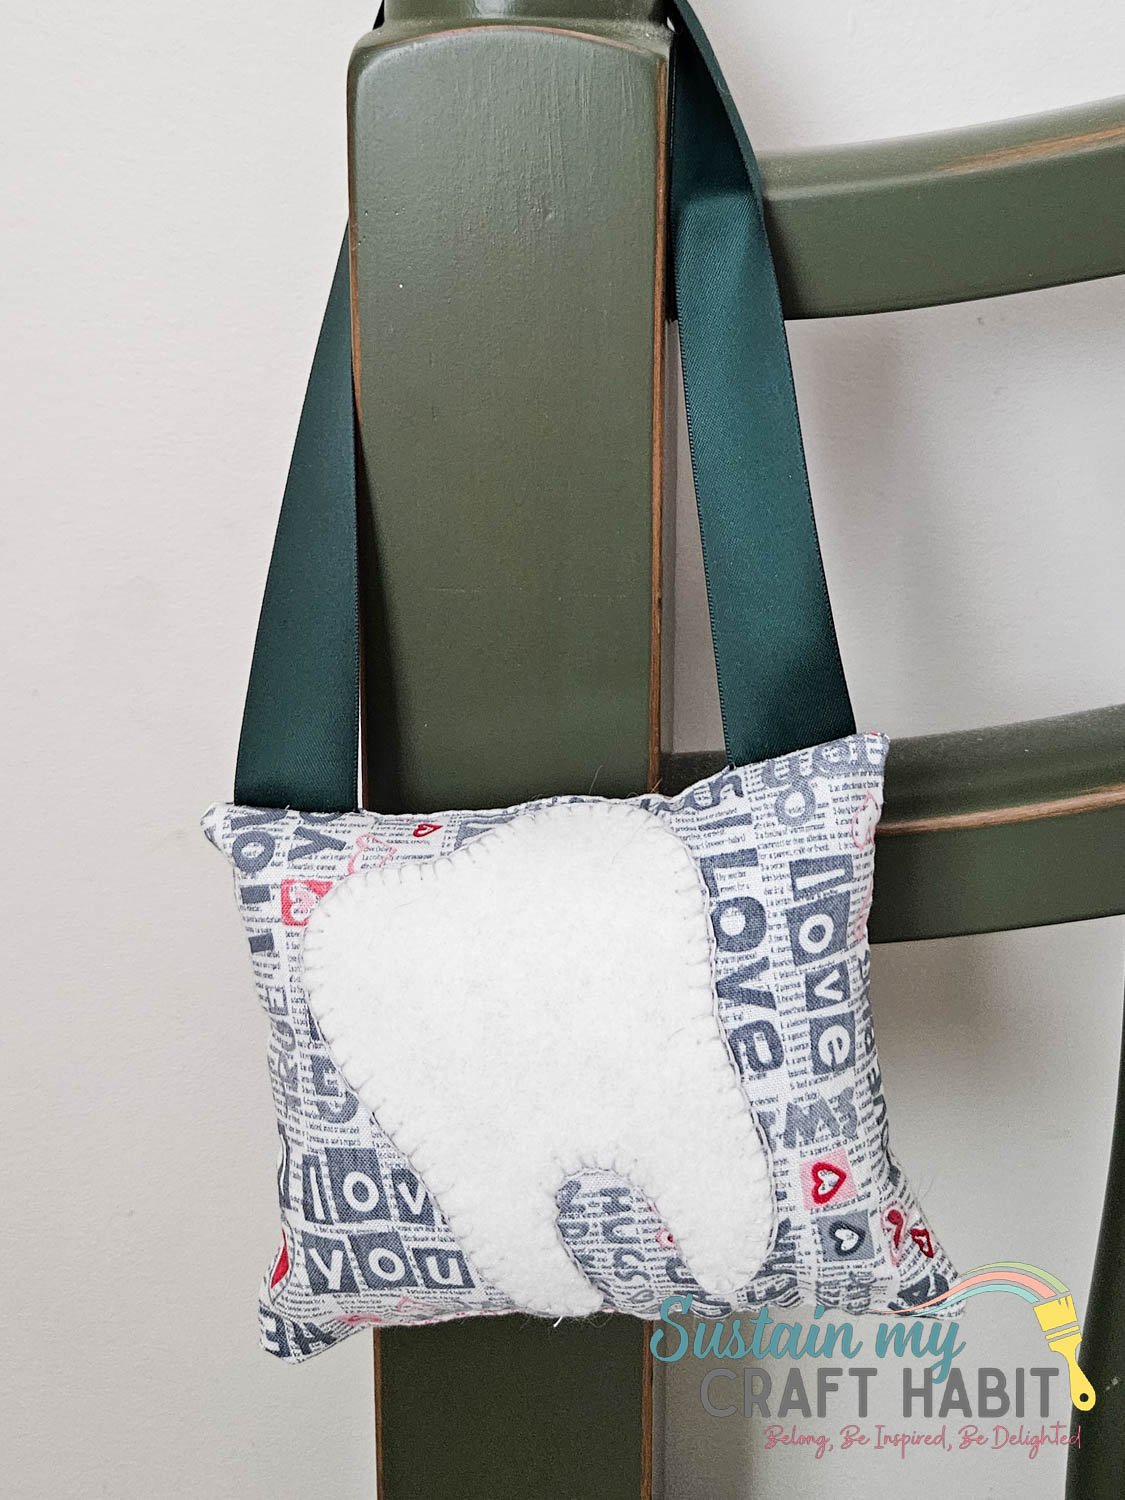
This DIY Toothfairy Pillow Sewing Pattern A fun and beginner-friendly sewing project that helps keep little teeth safe while adding a charming handmade touch to bedtime routines.
Download our Free printable patterns And discover how to create a whimsical, personalized keepsake that your little ones will love tucking under their pillows for years to come!

In this tutorial, you’ll find easy tips, creative variations, and helpful ideas for styling your finished pillow. Also, the project uses inexpensive materials and can be customized with different fabrics, colors and embellishments. Let’s get started!
Why You’ll Love Making Handmade Toothfairy Pillows
- Simple and inexpensive materials make this a budget-friendly sewing craft
- A complete beginner-friendly DIY sewing pattern with easy steps
- A thoughtful handmade gift makes a decor idea for a birthday or baby shower
- Children’s bedrooms add a whimsical touch to home decor ideas
- A small and quick project that is ideal for scrap fabric sewing projects
Let’s keep in touch! Subscribe For our latest sewing patterns, tutorials and tips.
Materials needed
How to sew a toothfairy pillow
Print the sewing pattern and tape together as per the instructions in the PDF.
Cut the pattern pieces in the desired fabric.


Fold the top edge of the POCKET (2) to the wrong side by ½” and press with an iron. Fold again and topstitch in place.

Align the single notches on the POCKET (2) piece with one side of the MAIN (1) piece with both right sides facing up.

Best stitch along the outer edges to hold the pieces together.
Align the ends of the ribbon with the small dots and baste stitch in place as shown.

Place the felt tooth cutout on top of the second MAIN (1) piece and zigzag stitch in place or, alternatively, sew with a blanket stitch in place.


Align both main pieces so right sides are facing and sew the layers together with a ½” seam allowance leaving a 2” gap opening.


Clip the corners to reduce bulk.

Turn the piece right side out and fold out the corners.
Add stuffing inside through the gap opening until you get the desired fullness.

Close the gap opening with a handmade ladder stitch (if you need help with this step, refer to our post How to sew by hand).

Add personal details
Customize your DIY Tooth Fairy Pillow sewing pattern with embroidered names, initials, buttons, ribbons or lace trim. You can also add a small pocket on the front to hold teething and fairy surprises.
Try different shapes and colors
Instead of traditional tooth shapes, experiment with stars, hearts, clouds, or animal-inspired designs. Soft pastel fabrics work beautifully for nursery decor ideas, while bright prints create a playful look for older children.
How to use a toothfairy pillow
A finished tooth fairy pillow can be more than just a bedtime accessory. Here are some creative ways to use it:
- Place it on a child’s nightstand or bed as a beautiful and functional home decor idea
- Add it to a nursery shelf display alongside books and stuffed animals
- Include it in a gift basket as a thoughtful handmade gift decorating idea for new parents or little ones
- You can hang the pillow from a bedpost or doorknob with a ribbon loop for easy access at night when the tooth fairy visits.


Whether you’re making a keepsake for your child, making a handmade gift, or looking for an easy sewing craft, these projects are both practical and adorable.
No more stress over losing that baby tooth under a big pillow in the dark and then waking up your little one…a toothfairy pillow will keep teeth safe and secure. Happy sewing!
More free printable sewing patterns to enjoy

Stay informed about our latest crafts, special offers and freebies via Joining our mailing list.
like? Pin it for later!

DIY Toothfairy Pillow Sewing Pattern
- 100% Cotton quilt Fabric scraps
- Fabric scissors
- Sewing machine and matching thread
- ribbon Cut 1” wide, 10” long
- Felt sheet in white
- Polyester bedding
- Printable toothfairy pillow pattern
-
Print the sewing pattern and tape together as per the instructions in the PDF.
-
Cut the pattern pieces in the desired fabric.
-
Fold the top edge of the POCKET (2) to the wrong side by ½” and press with an iron. Fold again and topstitch in place.
-
Align the single notches on the POCKET (2) piece with one side of the MAIN (1) piece with both right sides facing up.
-
Best stitch along the outer edges to hold the pieces together.
-
Align the ends of the ribbon with the small dots and baste stitch in place.
-
Place the felt tooth cutout on top of the second MAIN (1) piece and zigzag stitch in place or, alternatively, sew with a blanket stitch in place.
-
Align both main pieces so right sides are facing and sew the layers together with a ½” seam allowance leaving a 2” gap opening.
-
Clip the corners to reduce bulk.
-
Turn the piece right side out and fold out the corners.
-
Add stuffing inside through the gap opening until you get the desired fullness.
-
Close the gap opening with a ladder stitch.
Sharing is caring!



