
I’ll be honest, in the grand scheme of things in my home, my skirting boards don’t get much attention. However, the same cannot be said for my dog, Blossom, when she was going through her teething phase.
While most of my Furniture Her teething juice escaped unscathed, not so for my kitchen skirting boards, and for months, my eyes have zeroed in on those chewed and scratched corners every time I step into the room. Now she is out Shark Phase, I can finally get my skirting boards looking good as new again.
I didn’t want to invest in new skirting or spend hours doing anything too intensive (I for all Easy DIY project). Luckily, this sort of thing is well within the capabilities of a DIYer, and all in all, it took me about 20 minutes (plus drying time) and cost me about £10. This is how I did it.

1. Sand and clean the skirting board
Image 1 No 2


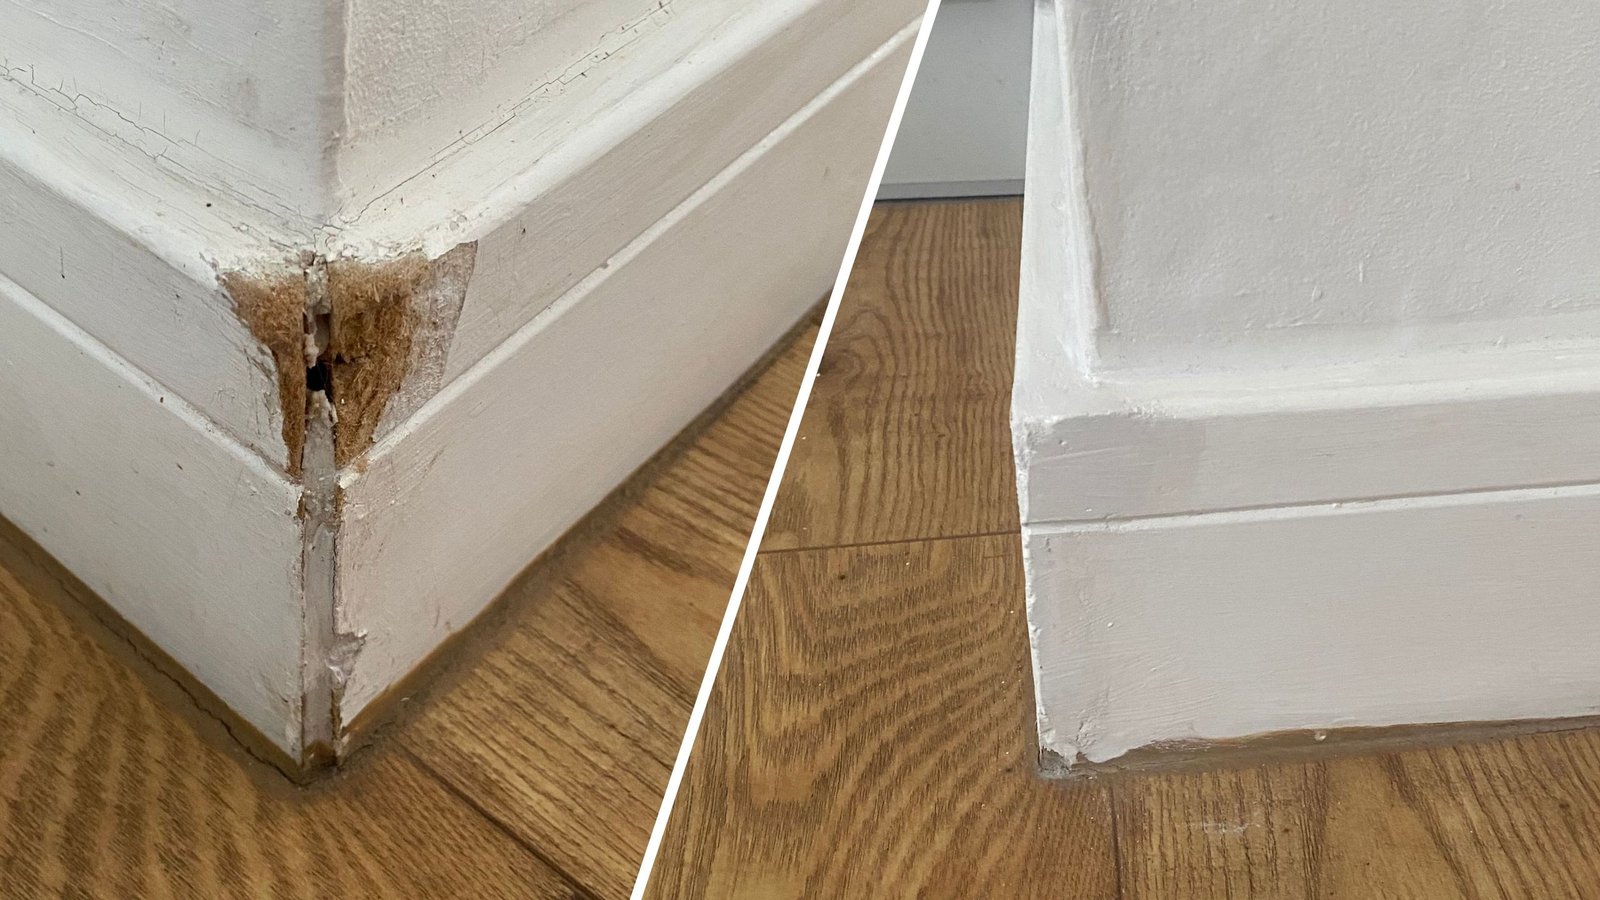
There were a few small dents and scratches on the skirting boards as a result of everyday life which could be masked with a fresh coat. color. However, there were two outer corners of the skirting where Blossom went to town and chewed the entire corner.
So first, I gave these areas a quick sand and cleaned down to remove any sharp bits and dusty debris. Fair warning, although I do vacuum around the skirting boards at least once a week, cleaning the chewed areas makes the whole lot feel so gritty. And I couldn’t pull that thread, so that was the end Cleaning of skirting boards All over the room before I start fixing the chewed parts.

Blossom
2. Build bulk with wood filler
Image 1 No 2


Next, I had a white wood filler (Roncell Multi-Purpose Wood Filler in White, £5.19 from Amazon) and used my finger to apply it to the areas I wanted to create. I found it best to do this in layers due to the consistency of the paste, otherwise, you’ll end up pulling the filler as you apply it. I tried using a palette knife to apply it, but found that the filler stuck more to the knife than to my finger.
I’ve read that if you struggle to get your wood filler to stick to the base layer, you can add some glue first to create a rough surface for it to stick to, but I personally found that I didn’t need this step.
I didn’t try to be neat either. I found that the more I tried to smooth the filler at this stage, the more it stuck to my fingers instead of the skirting board.
By the time I was done, it took about four thin layers to build up the right amount of wood filler, which took two minutes at a time to apply and I let it dry for a few hours between each layer.

Ronsel 100g Multipurpose Wood Filler Tube – White
I didn’t need a big tub of wood filler, so this tube was ideal. I gave the shake a good squeeze before taking the lid off to make sure it was well mixed.

I borrowed a hand sander like this from my mum, which made it really easy to follow the existing plane of the skirting board when sanding the filler to ensure a flush finish.

120 grit sandpaper (10 sheets)
I had about 120 grit sandpaper lying around, which I used to sand the wood filler.
3. Sand it down
Image 1 No 3


Once the wood filler was dry, I sanded the wood filler with 120 grit sandpaper so that it was flush with the main body of the skirting board, making sure to only sand in one direction to maintain the integrity of the wood filler.
Doing this highlighted the need for some more filler at certain points (although this second round of filler was pretty easy to make).

(Image credit: Future plc/ Sarah Handley)
This was the most time-consuming part, taking me a total of 20 minutes. I borrowed a similar hand sanding tool from my mother Hand sander £12.60 from B&QWhich I think helped ensure a flush and smooth finish. It was also a dusty process, so I made sure to wear a mask, eye protection, and have a vacuum handy.
My skirting boards are simple in design, with only one groove about an inch down from the top. This was lost after the filler was applied, but was incredibly easy to regain. I simply folded a piece of sandpaper in half, and used that folded edge to run along the existing grooves, again, instead of going back and forth in the same direction, to restore it to the filler. It would be relatively easy to recreate on a more decorative skirting board design using the same technique.
4. Paint the skirting board

(Image credit: Future plc/ Sarah Handley)
Although my skirting boards are white, and I used white wood filler, the colors didn’t exactly match, so I had to Give the skirting board a coat of paint. When it comes A type of paint to use on skirting boardsI had some leftover Dulux Brilliant White that I used on the walls and skirting the last time I decorated.
My verdict on the results
Considering the skirting board position first, I’m thrilled with the results. I wasn’t sure I could make them look remotely normal again, especially on a tight budget.
Sure, if you get really close, you can still see some imperfections, but seeing them gives me a sense of pride — I look at them and think, hey I fixed that and that means more to me than a perfect skirting board. Seeing as I already had some sandpaper lying around, it cost me about £5 to do that too!

If you enjoyed reading this, sign up for Ideal Home Newsletter All the latest home decor trends and inspiration delivered straight to your inbox


