

I recently sewed a simple keychain bag and since I loved it so much, I wanted to try sewing another cute bag with a slightly different design. This diamond shaped keychain pouch is just as awesome as the first one!
It’s simple and sweet, but also very easy to make. The design is also quite interesting as it is a patchwork project. I love that it all came together in the end though, which makes this little bag so special to me.
If you want to sew this exact bag, I’ve put together this detailed sewing tutorial that you can follow.

*This post may contain affiliate links. We will earn a commission at no additional cost to you if you use one of our links. Please read our disclosure for more details.
It’s also a beginner-friendly and quick sewing project. You can easily make several in just about an hour.
So, grab your supplies and join me as I show you how to sew this patchwork zipper pouch for keychains from start to finish!
Keychain Bag Tutorial
Consumables
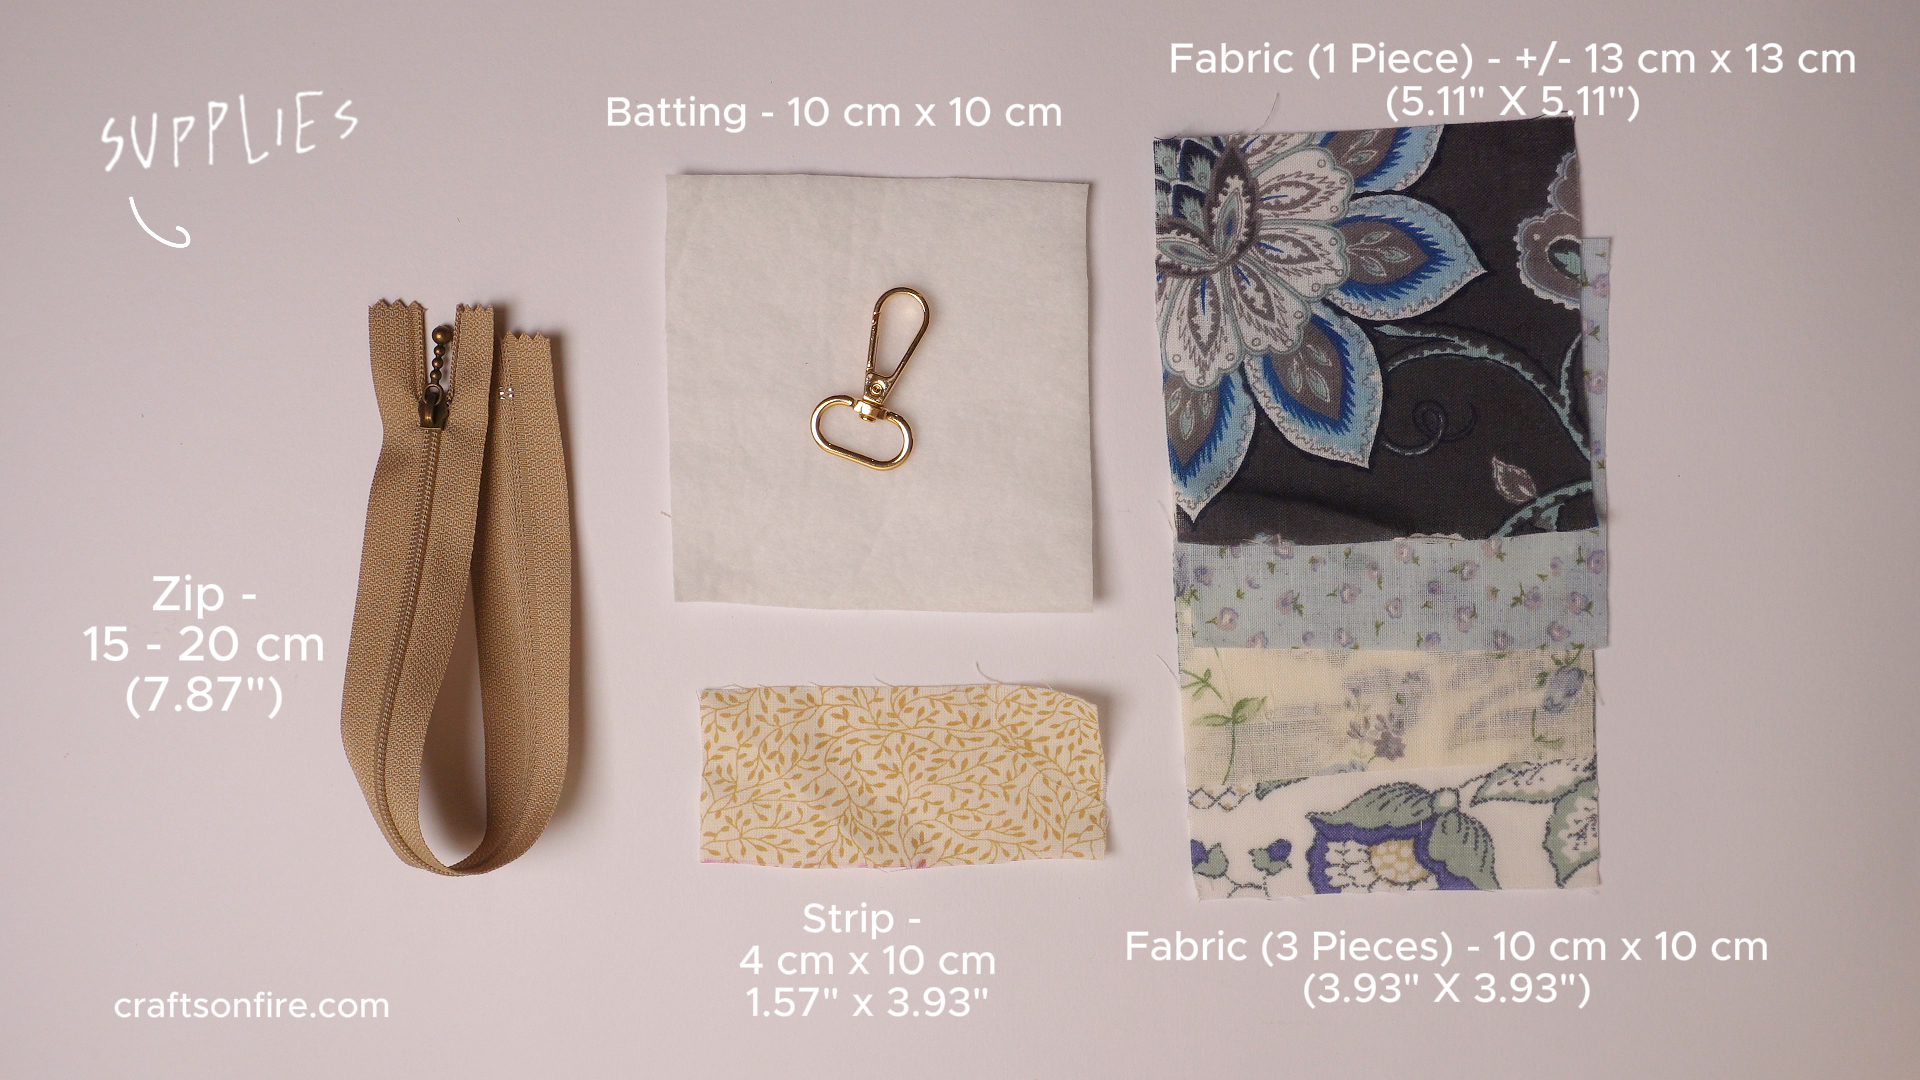
- 1 x Fabric Squares – 13cm x 13cm (5.11in x 5.11in)
- 3 x fabric squares – 10cm x 10cm (3.93in x 3.93in)
- 1 x wadding – 10cm x 10cm (3.93in x 3.93in)
- Tape – 4 cm x 10 cm (1.57″ x 3.93″)
- Zipper – 15 – 20 cm (7.87″)
- Keychain
Video tutorial
Instructions
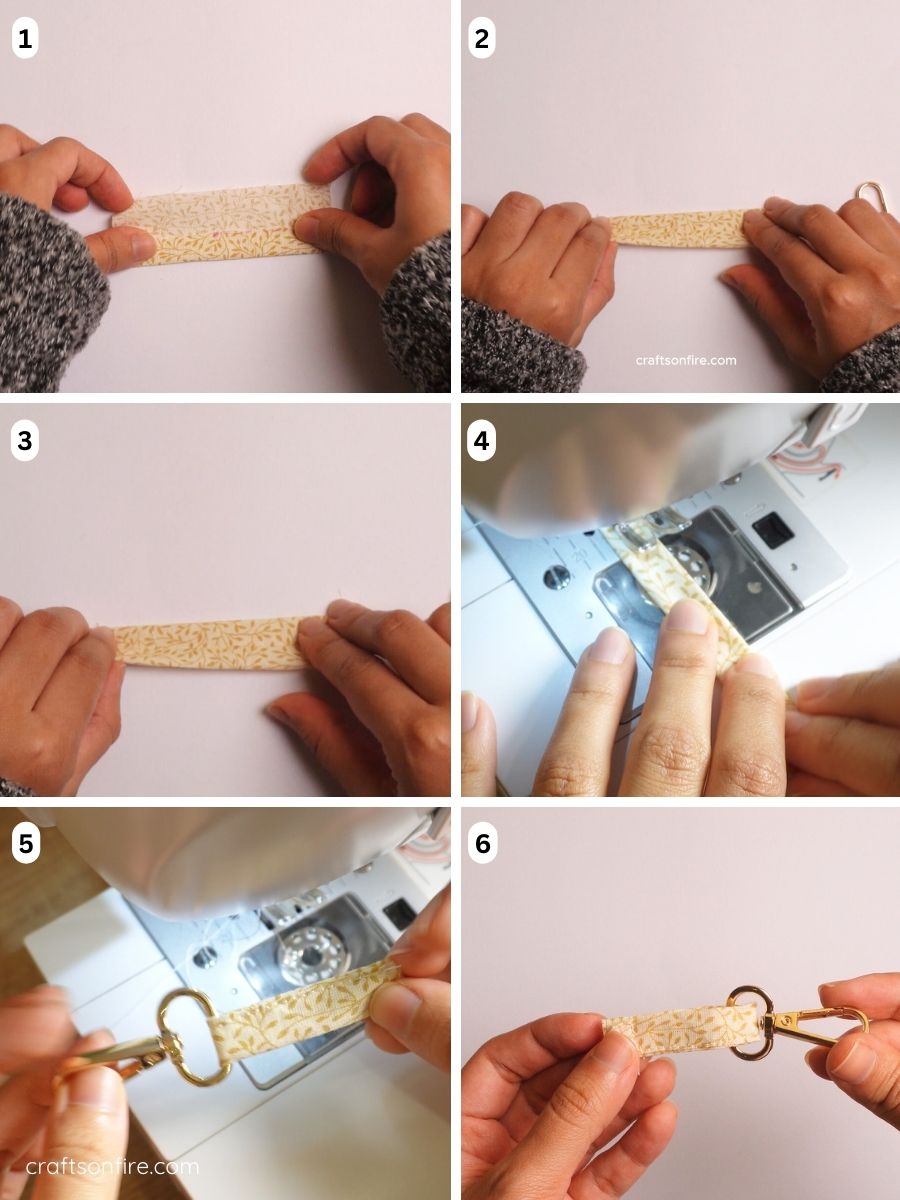
Steps 1-2: Turn the strip of fabric to the wrong side and bring the two sides together to meet in the center.
Step 3: Fold the piece in half again.
Step 4: Go to the machine and sew the strip close to the edge.
Step 5: Thread the ribbon through the key ring and fold it in half to make a loop.
Step 6: Sew the two ends together and your keychain should now be attached. Put that aside for now.
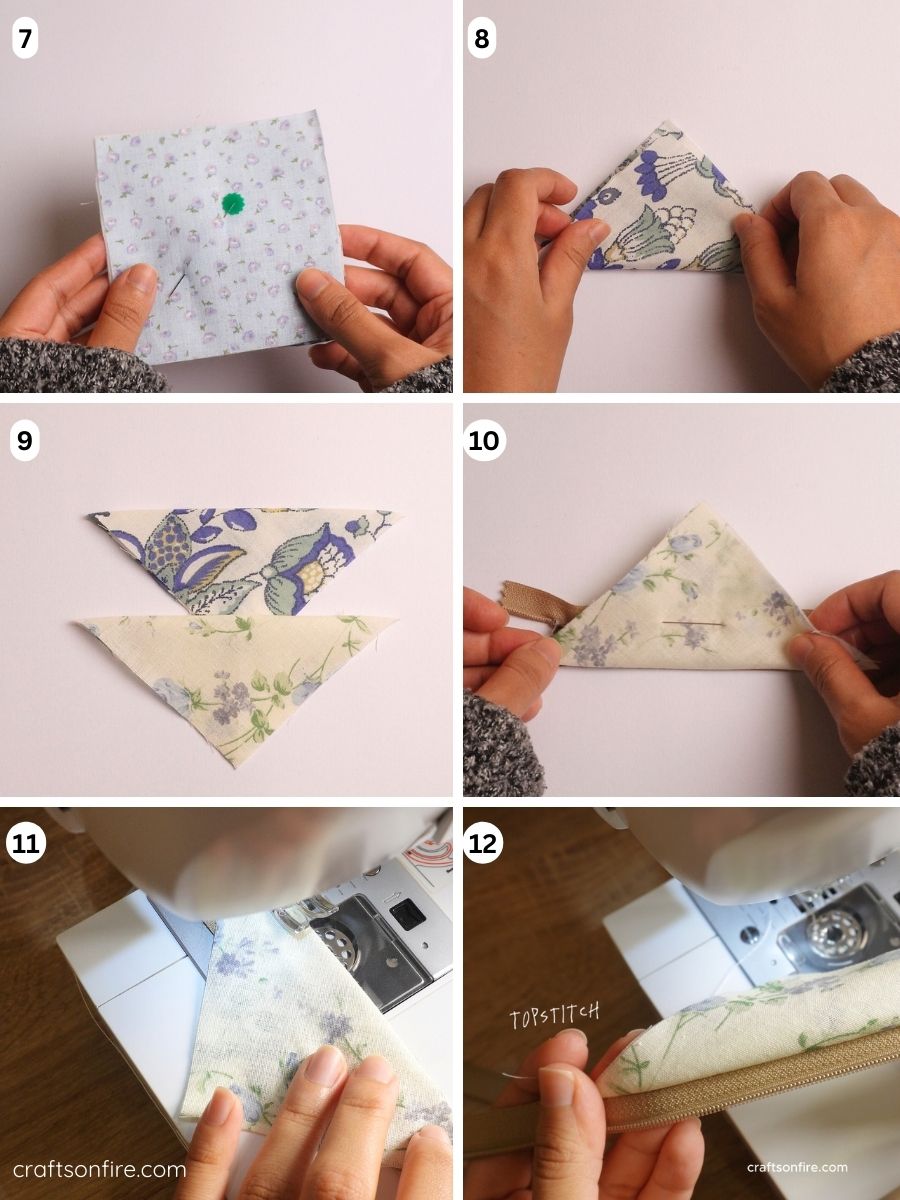
Step 7: Place the backing fabric and batting together. You can pin the piece together in the center.
Step 8: Take your first square of patterned fabric and fold it into a triangle. The right side is facing up.
Step 9: Repeat this for the second piece. You should now have 2 triangle pieces for the front of your zipper pouch.
Step 10. Take your zipper and place the first triangle piece on the edge of the zipper as shown in step 10.
Step 11: Sew the pieces together.
Step 12: Fold the fabric.
Step 13: Add topstitching.
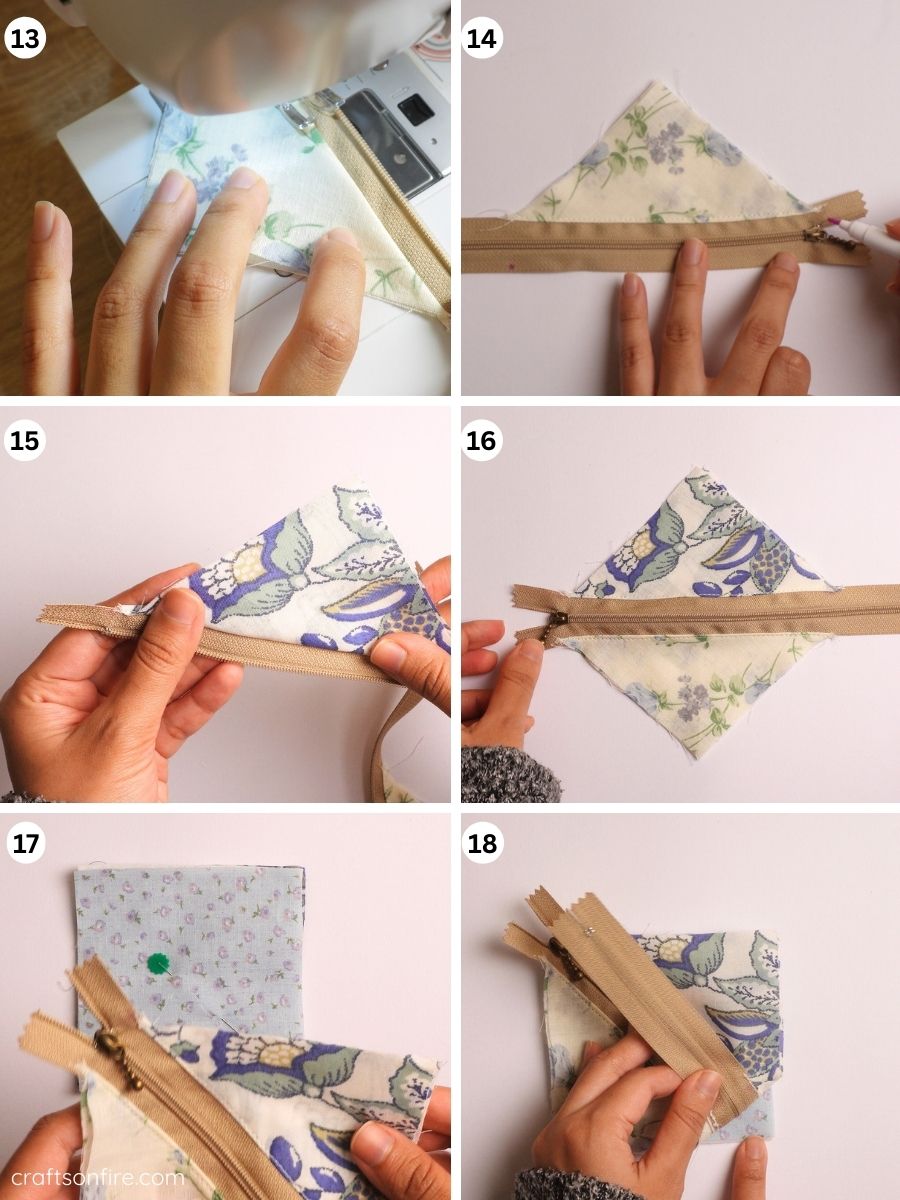
Step 14: Lay the piece down and mark the other end of the zipper. This will help create a guideline to ensure the pieces match.
Step 15: Sew the second piece to the zipper as shown in step 10. Match the fabric to the marked points. (You can refer to the video above if you’re not sure what to do.) Don’t forget to topstitch on this side as well.
Step 16: Your finished top should look like this.
Step 17: Grab the back (step 7) and place the top over it.
Step 18: Make sure the zipper is lined up with the corner of the bottom fabric as shown.
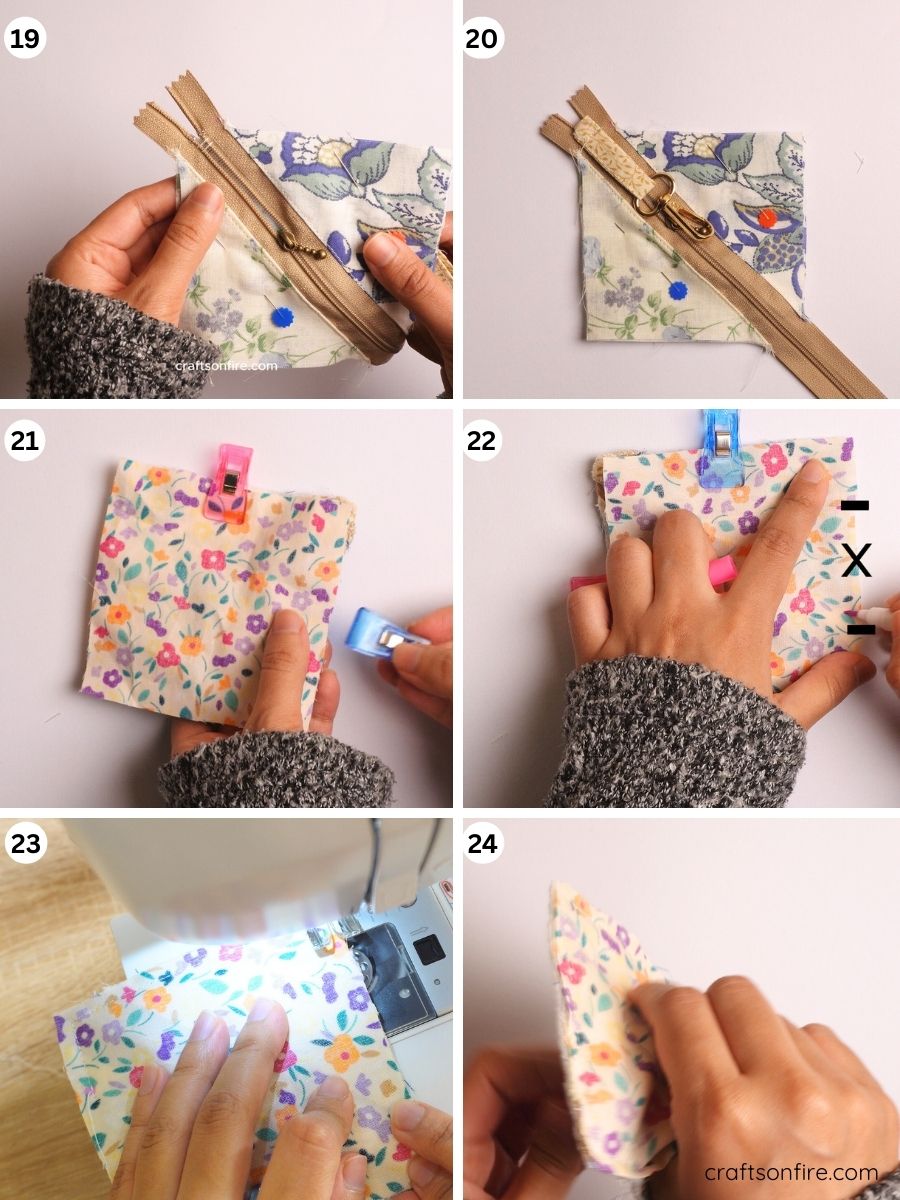
Step 19: Hand sew the top of the zipper and remove the excess top fabric on the sides to match the back.
Step 20: Grab the keychain and place it over the zipper (the keychain should be facing in).
Step 21: Take your last patterned square and place it on top. Use a sewing clip to hold the pieces together.
Step 22: Mark one corner of the square. Do not sew this section as we will soon use it to turn the piece right side out.
Step 23: Start sewing the piece using a 0.5 cm seam allowance. Be careful when sewing on the zipper as this can break your needle. You can skip sewing on this and hand stitch the ends of the zipper if you want to avoid this.
Step 24: Remove the piece from the machine and use the unstitched part to turn the pouch right side out.

Step 25: Simply insert your thumb and finger and pull the right side through the hole.
Step 26: Use a pen or closed scissors to open the corners of the bag.
Step 27: Fold the raw edges of the opening.
Step 28: Hand stitch the opening closed however you prefer, but I like to use the ladder method. This gives a lovely and easy invisible seam.
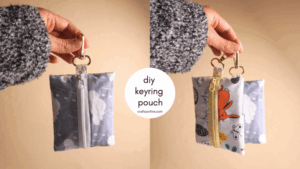
And your zippered keychain is finally complete!
Here’s what the front and back look like:

He is so cute! I love it Especially how all these different patterned fabrics come together to create this gorgeous artistic zipper pouch that you won’t find in the store.
This pouch is definitely a fun, easy and creative patchwork project. It’s also very easy to sew, which is perfect if you’re in the mood for something relaxed and pleasant.
If you’re looking for a DIY gift idea for friends and family, this could be a great project to consider.
Will you be sewing this zipper keychain anytime soon? I’d love to hear your thoughts.
If you need help, feel free to ask your questions in the comments below.
Before you go, here’s what you can sew next:
How to Sew a Half Moon Bag (Beginner Tutorial)


