

These 3 easy DIY wall shelf brackets make it easy to add a shelf wherever you need it, from your kitchen or bathroom to your living room or bedroom.

3 Easy DIY Wooden Shelf Brackets
Building a shelf is a great DIY starter project—cheap, requires minimal tools, and is easy to customize. You can buy inexpensive shelf brackets to make open shelves at any home improvement store or even Walmart… or you can grab a few pieces of wood from the scrap pile and make your own!
The best part about making your own DIY shelf brackets is that you control the size of the bracket for a custom fit to your desired shelf depth – you can even glue 2 brackets together for a thicker shelf bracket.
In this blog post, we’ll show you 3 ways to build a wooden shelf bracketwith a variety of bracket sizes and styles to fit whatever you need. You will only need the wood of your choice and some basic tools.
This post contains affiliate links. Learn more and read our full disclosure policy here.
Materials and tools to build a DIY wall shelf bracket.
- wood material: depending on the style of shelf bracket, you will want a 1×8, 2×8 or 2×10 board, or 4×4. Basic pine is the cheapest and takes paint well; if you’re looking for a beautiful stained wood shelf bracket, consider investing in hardwood planks instead.
- Miter saw and/or jigsaw
- A drill
Note: These shelf brackets combined with a 1 1/2″ wood shelf are strong enough for decoration and other lighter items. For heavy loads such as books or plates, the shelves MUST be securely mounted to the walls.

Simple solid DIY wall shelf bracket.
For this simple decorative shelf bracket, all you need is a piece of 4×4 (or larger) lumber, a miter saw, and a drill to hang the shelf bracket on the wall.
Sarah showed us how to make these simple shelf bracket brackets step by step:
- Cut the bottom of the bracket board at the angle you want. Most saws will cut at a 45 degree angle. To cut a steeper angle for a longer bracket face, simple follow Justin’s instructions here to use a piece of wood to create a new fence and cut it at an angle of 50 degrees (or more) using a circular saw.
- Then measure 1-3 inches up from the top of the miter cut and cut the top of the bracket at a 90 degree angle to hold the shelf.
- Repeat to create a second shelf bracket.
- Stain or paint the shelf bracket (and shelf) as desired.

To hang the shelf brackets, pre-drill 2 holes through the corner edge of the bracket and into the studs in the wall, then secure with 3-inch screws. (If there are no wall studs where you want to put the shelf, use drywall anchors.) Use a laser level to make sure the brackets are level at the same height.
Cut a 2×6, 2×8, or 2×10 board to your desired shelf length and attach it to the brackets using wood glue and 1-2 screws through the shelf in each bracket.

Basic curved wall shelf bracket
It’s so easy to make your own curved wooden shelf bracket, and it’s a great project to use up some scrap wood *and* practice cutting curves with your jigsaw or circular saw. You will need a 2×8 board or pieces, a jigsaw, a drill, and 2 padlock hangers.
Ananda gave us easy step by step instructions for wooden clamps (including a printable template!):
- Draw your curved bracket (or use the free printable template) and outline 2 on the 2×8 board.
- Use the jigsaw to cut out the two curved edges.
- Clamp the 2 pieces together and sand any rough edges on the curves to match.
- Attach a lock hanger to the back of each bracket. The hanger can be attached flush or you can use a router bit or small Forstner drill bit to countersink the hanger slightly into the back of the bracket.
Use wood glue and screws or nails to attach a board to the top of the brackets to form the shelf. (Or be creative and use old books to make a shelf as Ananda did!) Install screws in the studs (or wall anchors) to hang the shelf using the hangers in the lock.

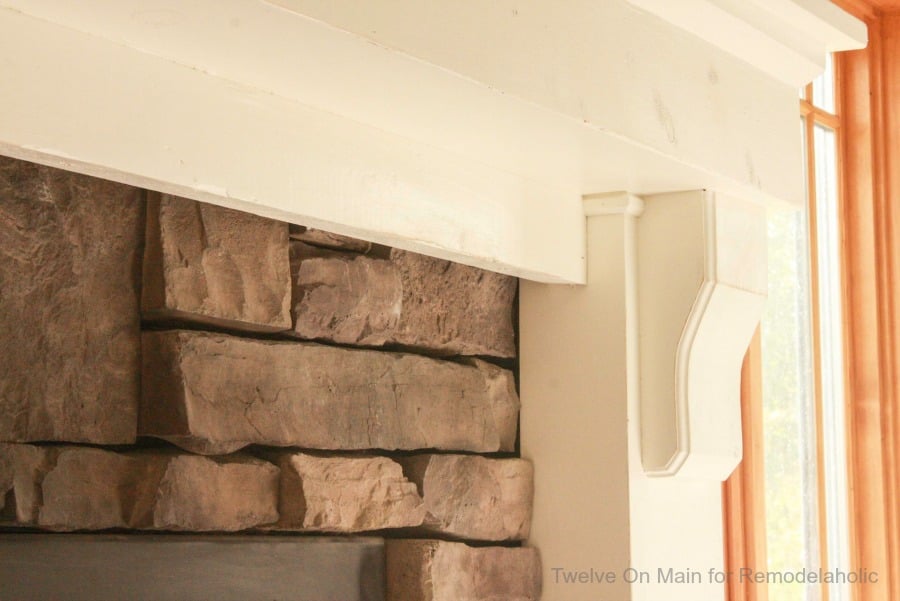
If you have a router, you can dress up the simple curved bracket as Sarah did on her extra thick corbels here.

Vintage multi-layer wall shelf bracket
This layered shelf bracket is a beautiful combination of a solid bracket and a curved bracket, and it’s so easy to make! Just grab your jigsaw, 1×8 and 2×10 (full boards or scraps) and some wood glue to add this decorative element to your shelf.
Amy shared step by step instructionsyou can too download the printable template here.
- Trace 2 pieces of the outer brace to the 1×8 and 1 piece of the inner brace to the 1×10.
- Carefully cut out the 3 bracket pieces using a jig saw (or circular saw or band saw) and carefully sand any rough areas to remove pencil marks.
- Glue and nail the outer bracket pieces to the inner bracket piece, one on each side flush with the top and offset about 1/4″ over the curved edges.
- Measure and cut a piece of 3/4″ thick wood to approximately 1″ x 8″ to fill the top of the decorative section. Glue and nail it in place.

To hang the shelf brackets, you can drill holes through the center of the bracket or use keyhole hangers on the back of the bracket. Like other shelf brackets, you will attach the shelf to the brackets using glue with nails or screws through the shelf and into the bracket.
Other applications for DIY shelf brackets.
Brackets are a functional support for shelves and can also be a beautiful visual addition to other horizontal skirting boards in your home, such as the kitchen island, fireplace or even the door.

The brackets can also be used as book dividers on an open shelf – just turn the bracket upside down like this simple hack for IKEA shelf brackets. (This will lower the weight limit on the shelf, FYI.)

And if you need a cheap and easy open shelving system with sturdy brackets, see how we made it The cheapest and easiest open shelves with brackets that disappear.

DIY Shelf Bracket FAQ.
How Much Weight Can DIY Wood Shelf Brackets Hold?
The weight limit of the shelf is determined partly by the materials and partly by the attachment to the studs. For these 3 types of shelves, using a 1 1/2″ shelf about 30″ long or less and securely attached to 2 studs, I would estimate that the shelves can easily take 20+ lbs (10 lbs per stud attachment) and possibly more – that’s a conservative estimate!
If you want to add extra strength to your DIY shelf brackets, use this trick we saw on Parade of Homes: Add a horizontal support board along the length of the shelf. This installation also uses some additional vertical boards for a nice clean look.

Should the shelves overhang the brackets?
Yes, both visually and structurally, shelves can overhang brackets. However, the front edge of the shelf should not be more than a few inches above the front of the bracket.
What size should the shelf brackets be?
As a general rule of thumb for shelves, the shelf bracket should be taller than it is deep, and the depth of the bracket should be at least 2/3 the depth of the shelf (and more will be stronger). The shelf bracket must be attached to studs in 2 places and to the shelf in a minimum of 2 places.
Do you attach brackets to a wall or shelf first?
Or depending on the project. Attaching the brackets to the shelf first ensures they are flush and square with the shelf, but it may be easier to attach the brackets to the wall first to ensure a secure attachment to the wall (without the shelf getting in the way).
More DIY shelving ideas you’ll want to build

Connected


